How to Frost a Cake with Buttercream (Smooth Finish)
This simple tutorial will teach you how to frost a cake with smooth edges for a nice, professional finish on your home baked cakes!
Ingredients
- 2 8" round cake layers I'm using basic chocolate cake layers
- x2 recipe Easy Buttercream Frosting
- 1/4-1/2 cup Fresh fruit or filling optional
- 1 Cake leveler or a long serrated knife
- 1 Turntable optional
- 1 Serving plate or cake board
- 1 Knife, palette knife or bench scraper
- 1 Spatula
Instructions
1 - Bake the cakes and level the tops
-
Bake your cakes and allow them to cool completely. Use a cake leveler or a long, serrated knife to cut off the rounded tops of the cakes. Make each layer the same height approximately with level tops. If you're using a knife, make sure to use a gentle sawing motion to cut through the cake.
-
TIP: The cakes I'm using for this tutorial are fresh, but if you cover and refrigerate the cakes overnight before working with them, that will make them much easier to work with. The moisture will soften the crusted edges of the cake for easy cutting, and the time sitting will help the cakes settle into a more solid form.
2 - Assemble the cakes
-
Place your cake plate or board onto the turntable if you have it, and smear a little dollop of frosting on the centre of the board. Next, cut side up, place one of your cake layers onto the board and press it into the frosting. This will keep it from shifting around on the plate.
-
Spoon another dollop of frosting onto the cake and spread it evenly over the surface, applying enough pressure to "Lock the crumbs in." Spread the icing far enough to peak over the sides a little.
-
If frosting is the only thing you want to use in between the layers, you can put the next cake layer (cut side down) over top, and press it down firmly so that excess icing squeezes out the sides. If you want to fill your cake with some kind of fruit or filling, however, proceed to the next step.
-
To fill a cake with fruit, jam, or some other kind of filling that isn't frosting, you will need to create a border of frosting around the edge of the whole cake that is quite thick and high. Think of it as a sort of "nest" for your fruit or filling. You can do this with or without a piping bag.
With a piping bag: Spread the icing on the cake to the edges thinly. Pipe a thick border around the outside, and fill the centre with a thin layer of fruit or filling.
Without a piping bag (as in this tutorial): Spread a thin layer of frosting onto the surface of the cake to lock the crumbs in as mentioned previously. Spread a generous amount of frosting around the edges of the cake to create a border. Fill the centre with a thin layer of fruit or filling. If you used fresh fruit (as I have in this tutorial), add little dollop of frosting on top of the fruit.
-
Press the second layer of cake (cut side down) on top. Press it down firmly so that excess icing squeezes out the sides.
-
Why "a thin layer" of filling?
Yes yes, I know - we all want a little extra of the delicious part in the middle, right? Well, the reason I don't recommend that is that adding too much in the middle increases the risk of it oozing out onto the cake. It also increases the risk of the whole thing sliding sideways at some point... Which is a stress like no other. So, resist! Your cake's appearance depends on it.
3 - Crumb coat the cake
-
Using an angled spatula, spread the frosting that sticking out the sides flat against the side of the cake. Then put another dollop of frosting on the top of the cake, and again, firmly spread that over the entire surface of the cake to lock in the crumbs. If there are any loose crumbs hanging around on your work surface, clean them up before your proceed.
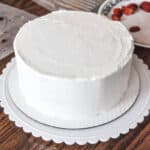
4 - Frost the cake
-
Add a generous amount of frosting to the top of the cake. And yes, I mean LOTS. It's always easier to take some off than to try to patch up mistakes later!
-
Spread the frosting from the centre of the cake out, until it starts to droop over the sides a little. Spread the frosting down over the sides until the whole cake is well coated with a thick layer of icing. Wipe the blade of your spatula to clean it, and run it along the sides of the cake as you turn it, smoothing the sides and scraping off excess frosting as you go.
-
Once the sides are quite smooth, there will likely be a little ridge of frosting standing up from the top. Clean the spatula again, and spread from the edge of the top toward the centre, till the icing is evenly spread over the top of the cake. Clean the spatula one more time, and go back over to smooth any ridges on the top the best you can.
-
Remember: It doesn't have to be completely flawless. Once this cake gets decorated, you can cover up any little imperfections with piping.