
Pumpkin Cookies
This tutorial for making pumpkin themed sugar cookies is a sweet, beautiful way to dress up your holiday season!
Ingredients
- 1 recipe prepared Classic Sugar Cookies, cut with circle and pumpkin cutters see notes for links
- x2 recipe Royal Icing see notes for the recipe post link
- 1 each gel food colouring in yellow, green, and brown
- 6 12-inch piping bags
- 1-4 couplers
- 1 #2 piping tip
- 1 #3 piping tip
- 1 #5 piping tip
- 2 large cookie sheets to work on
- 1 roll parchment paper to work on optional
- 1 clean rag
- 1 package pins or toothpicks
- 1 pair scissors
Instructions
-
Bake the cookies according to the recipe instructions, using a 3" circle cookie cutter, 4" circle cookie cutter, and 2-3" pumpkin cookie cutter to cut the cookies.
While the cookies are warm, stamp the centres of the large circle cookies with your pumpkin cookie cutter, to leave the impression of a pumpkin shape on the surface. Cool completely, and set aside.
-
Prepare the royal icing according to the recipe instructions, and spoon a little bit of white royal icing (about 1/2-3/4 cup) into a small or container. Cover tightly and set aside, and cover the rest tightly with a lid, sheet of plastic, or a damp cloth to keep it from drying out until you are ready to use it.
-
When you are ready to start decorating, divide the rest of the icing between 2 bowls. Cover one bowl with a damp tea towel while you colour the other one.
-
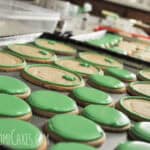
Tint the icing in the other bowl with green gel food colouring (one drop at a time), until the colour reaches your desired pigment. Spoon a little bit of the green icing into a piping bag fitted with a coupler and a #3 round piping tip, keeping the rest of the icing covered with a damp tea towel while you work. Pipe the green stems of your pumpkin cookies, and then pipe a border around the perimeter of each circle-cut cookie. Set aside to dry.
-
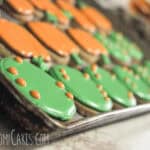
Tint the remaining icing with orange food colouring, and then separate out about 1/2 cup of icing into a smaller bowl. Add brown gel food colouring, a drop at a time, until you have a rust coloured orange. Spoon a little bit of the rust coloured icing into a piping bag fitted with a coupler and a #5 round piping tip (again, keeping the rest of the icing covered with a damp tea towel while you work). Pipe the outline of the pumpkin shaped cookies, and around the stamped pumpkin outline on the large round cookies. Set aside to dry.
-
Thin about 200-205g (about 1/2 of the green tinted icing, and an equal amount of orange) with about 2 to 2-1/2 teaspoons water. Start with 2 teaspoons, and then check your consistency.
To check to your consistency, scoop a bit of icing out of the bowl with a spoon, and then drop it back in. If the icing you dropped back in sinks in and blends smoothly with the rest of the icing in 10 seconds, it is perfect. If the icing is smooth in less than 10 seconds, it is too thin and will run over the edge of your cookies (in which case, you should add a little more stiff icing to thicken it back up). If it takes longer than 10 seconds (or never blends in completely at all), add more water by the drop, mixing well and re-testing, until it dissolves in 10 seconds (icing that is too thick will not dry with a smooth finish).
-
Pour the thinned royal icing into 2 piping bags, one for the green and one for the orange. Snip off the tip of the green icing bag with scissors to make a small opening, and carefully allow the icing to flow into the outlines you created for your round cookies, starting on the edges and filling the cookies until the inside of the outlines are full. Use a toothpick or pin to spread the icing into any empty pockets around the outline.
-
Snip off the tip of the orange icing bag with scissors to make a small opening, and carefully allow the icing to flow into the outlines of the pumpkin shapes, starting on the edges and filling the cookies until the inside of the outlines are full. Use a toothpick or pin to spread the icing into any empty pockets around the outline.
Drop small dots of the runny orange icing onto the edges of the small round green cookies (as pictured).
-
Allow the cookies to dry, undisturbed, for at least 12-24 hours.
-
Re-beat the white and rust coloured royal icing until it has a matte finish and forms stiff peaks with an electric or stand mixer, about 5-10 minutes. Pipe around the outlines of the pumpkins in rust to give the cookies better definition, and add white accents (such as the little while stem curls) as desired. Allow the cookies to dry completely, at least 2 hours.
Package or serve as desired. These cookies can be made at least a week in advance and stored at cool room temperature.
-
Note: To keep the icing from drying inside the end of your piping tips when the bags are left between tasks, pipe a small amount of icing out of the tip and allow it to hang off the end. When you a ready to use the bag again, break the dry tip off, and continue working. If any icing is stuck to the outside of the tip, clean it off with a clean rag and continue piping as before.
Recipe Notes
- Classic Sugar Cookies, baked and cut with a 4" circle cutter, 3" circle cutter, and 2"-3" pumpkin cookie cutter
- Royal icing, prepared
- Gel food colouring
- Piping bags
- Couplers (optional)
- #2 piping tip
- #3 piping tip
- #5 piping tip
- Scissors
- Cookie sheets (to work on)
- Parchment paper (to work on, optional)
- Clean cloth/rag