
Tinting Gum Paste Rose Leaves with Petal Dust [Tutorial]
Some weeks ago I finished a tutorial on how to make gum paste roses for cake decorating, and then I followed that up with a brief note on making gum paste leaves as well. In this post, I want to show you how to color those gum paste rose leaves with petal dust, for the most beautiful sugar display possible.
Get ready to take your gumpaste roses to the next level with this simple tutorial using nothing but dry colors (petal dust), a plate, and a paint brush.

What is gum paste
Gum paste is a type of pliable, soft sugar paste that can be rolled and (like dough) into shapes for making gumpaste flowers, leaves, and other decorative accents. The incredible thing about gum paste is that it dries completely hard, making it possible to create gorgeous, shelf-stable, edible flowers that look completely real, or at least, very nearly.
I most often use gum paste to make edible flowers and leaves, edible ruffles, or miniature sculpted decor pieces (rather than using modeling paste).
To use gum paste as modeling paste, I have usually done a 50/50 mix of gum paste and sugar paste (fondant), kneading them together on a lightly greased work surface until they are well mixed.
The best kind of gum paste to use
I’ve used a bunch of different kinds of gum paste, and so far I have found pretty much everything to work very well. I would say that Wilton brand is not my favorite (it has a slightly chemical smell), but it still works very well, and I have definitely been happy using it in a pinch.
If you’re shopping for gum paste in person (rather than ordering it online), I recommend squeezing the bag that it comes in to make sure it feels soft. Sometimes, I have found, gum paste that’s a bit older might have some hard, dried bits in there, which you will have to remove before you can make your gum paste cake decorations.
At the moment, I’ve been using this kind of gum paste, and I’m enjoying it very much.
How to make gum paste flowers
I have spent a considerable amount of time the last few weeks showing you guys how to make a rose bud, a medium rose, a full rose, and rose leaves. I also showed you how to make white roses into red roses, using petal dust to color the finished product.
There are so many other types of gum paste flowers out there to make, including peonies, calla lilies, orchids, carnations, blossoms, and you-name-it. Pretty much, if you can if you can find the cutters for it, you can make the flower.
If you want to check out some of my tutorials (linked above), you can go ahead and click through to those. Today, however, I’m going to focus on finishing my rose series with this tutorial for coloring rose leaves.
Making leaves from gum paste
Leaves are honestly one of the simplest things to make from gum paste because you can use a silicone leaf veiner to make the shape and the veins super realistic (without too much bother at all). There are many different types of leaf cutters and leaf veiners out there, and by following my basic rose leaf tutorial, you can pretty easily make any type of edible leaf.
The most common way to make leaves from gum paste is this: Cut out the shape, vein the leaf, dry it, and color it. You can also insert a piece of floral wire into the soft gum paste for the stem, which makes the leaf easy to bind together with roses (using floral tape) for an incredible, edible display that looks like it is made with real flowers!
What kind of food coloring do you use for realistic sugar flowers?
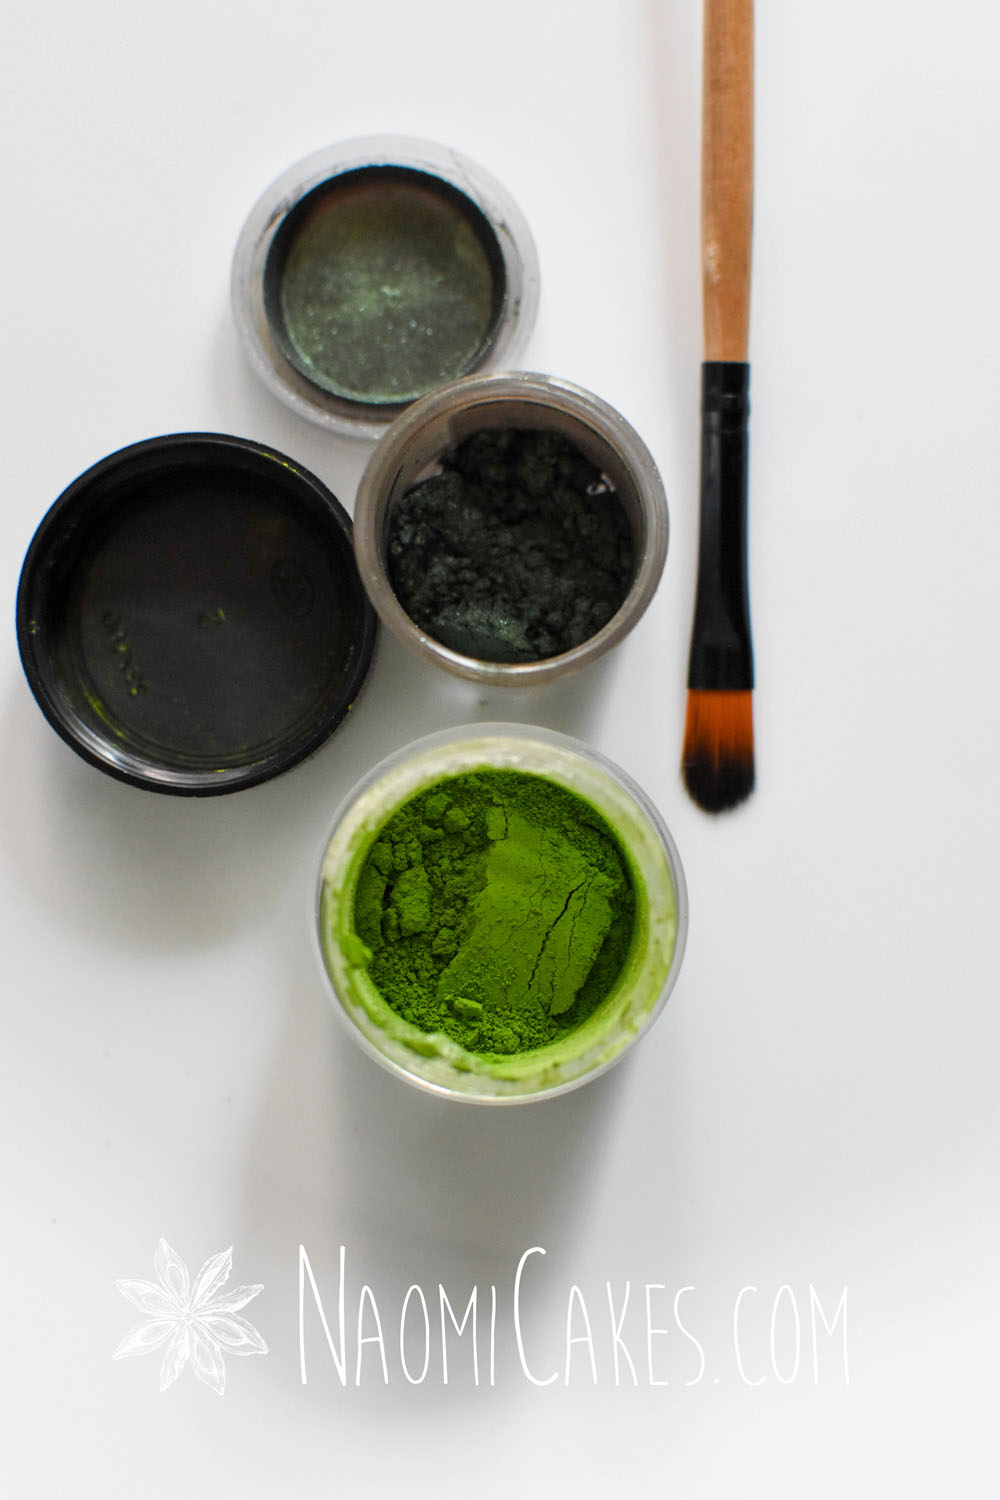
To color your leaves, you can use this tutorial, in which I will use petal dust to give my leaves color. Petal dust is incredible, in that it comes in so many different colors (bold, beautiful colors), and you can use cornstarch to dilute the color in order to get a lighter shade.
In addition to petal dust, there is also pearl (or shimmer) dust colors or luster dust colors, which add a pearly sheen or metalic shimmer to whatever you are trying to make. For making gold and silver edible accents, luster dust is an incredible option for making edible accents that look like they’re made of precious metals.
Choosing your colors
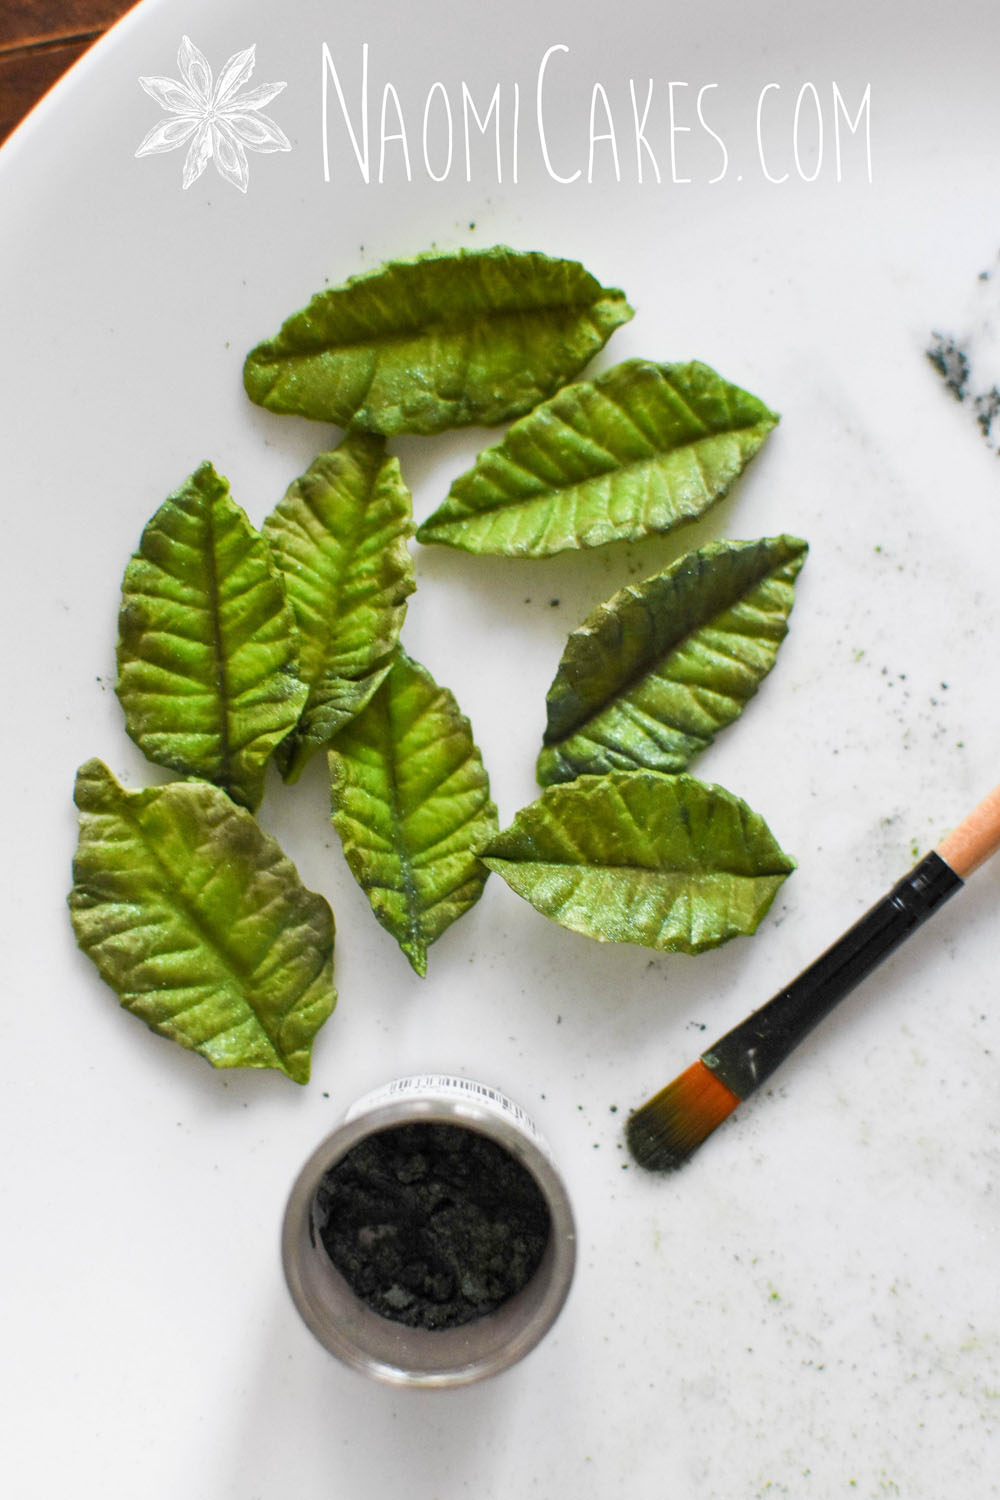
I like to use two colors for making edible leaves, just to create some color depth and texture. I usually like to go with one darker color and one lighter one, usually from the same colour palette.
Today, I am going to use two very different greens. Mostly because my stock is a little low and I wanted to use what I had, but also to show you how that can actually look amazing!For my base, I’m using zesty lime petal dust (a matte colour), and for the edging I’m using holly green luster dust (a shiny colour).
If you’re curious what I would more normally gravitate toward (if I had my full palette of colours to choose from), I would probably go for a base of something like Citrine Green, Moss Green, Sage Green, or even Grass Green, and then I would finish generously with Rose Leaf Green, Forest Green (or something similar).
You will need:
In order to do this right, you’ll need a new/clean paint brush (don’t use one that’s been used for non-edible substances in the past), the petal dust colours of your choice, and a nice big plate to work on. At a glance, here’s the list:
- Your pre-made gum paste leaves
- Petal dust (in the colors of your choice – I’m using Zesty Lime and Holly Green in this tutorial)
- New/clean paint brush
- Large plate
- Apron (optional, to protect your clothing from excess color)
…Yup, that’s all!


Tinting Gum Paste Rose Leaves with Petal Dust
Here's an easy tutorial for adding color to gum paste rose leaves (or any other type of leaf)!
Ingredients
- 12+ pieces pre-made gum paste leaves
- 2 containers petal dust in the colors of your choice – I’m using Zesty Lime and Holly Green in this tutorial
- 1 new/clean paint brush
- 1 large plate
- 1 apron (optional, to protect your clothing from excess color)
Instructions
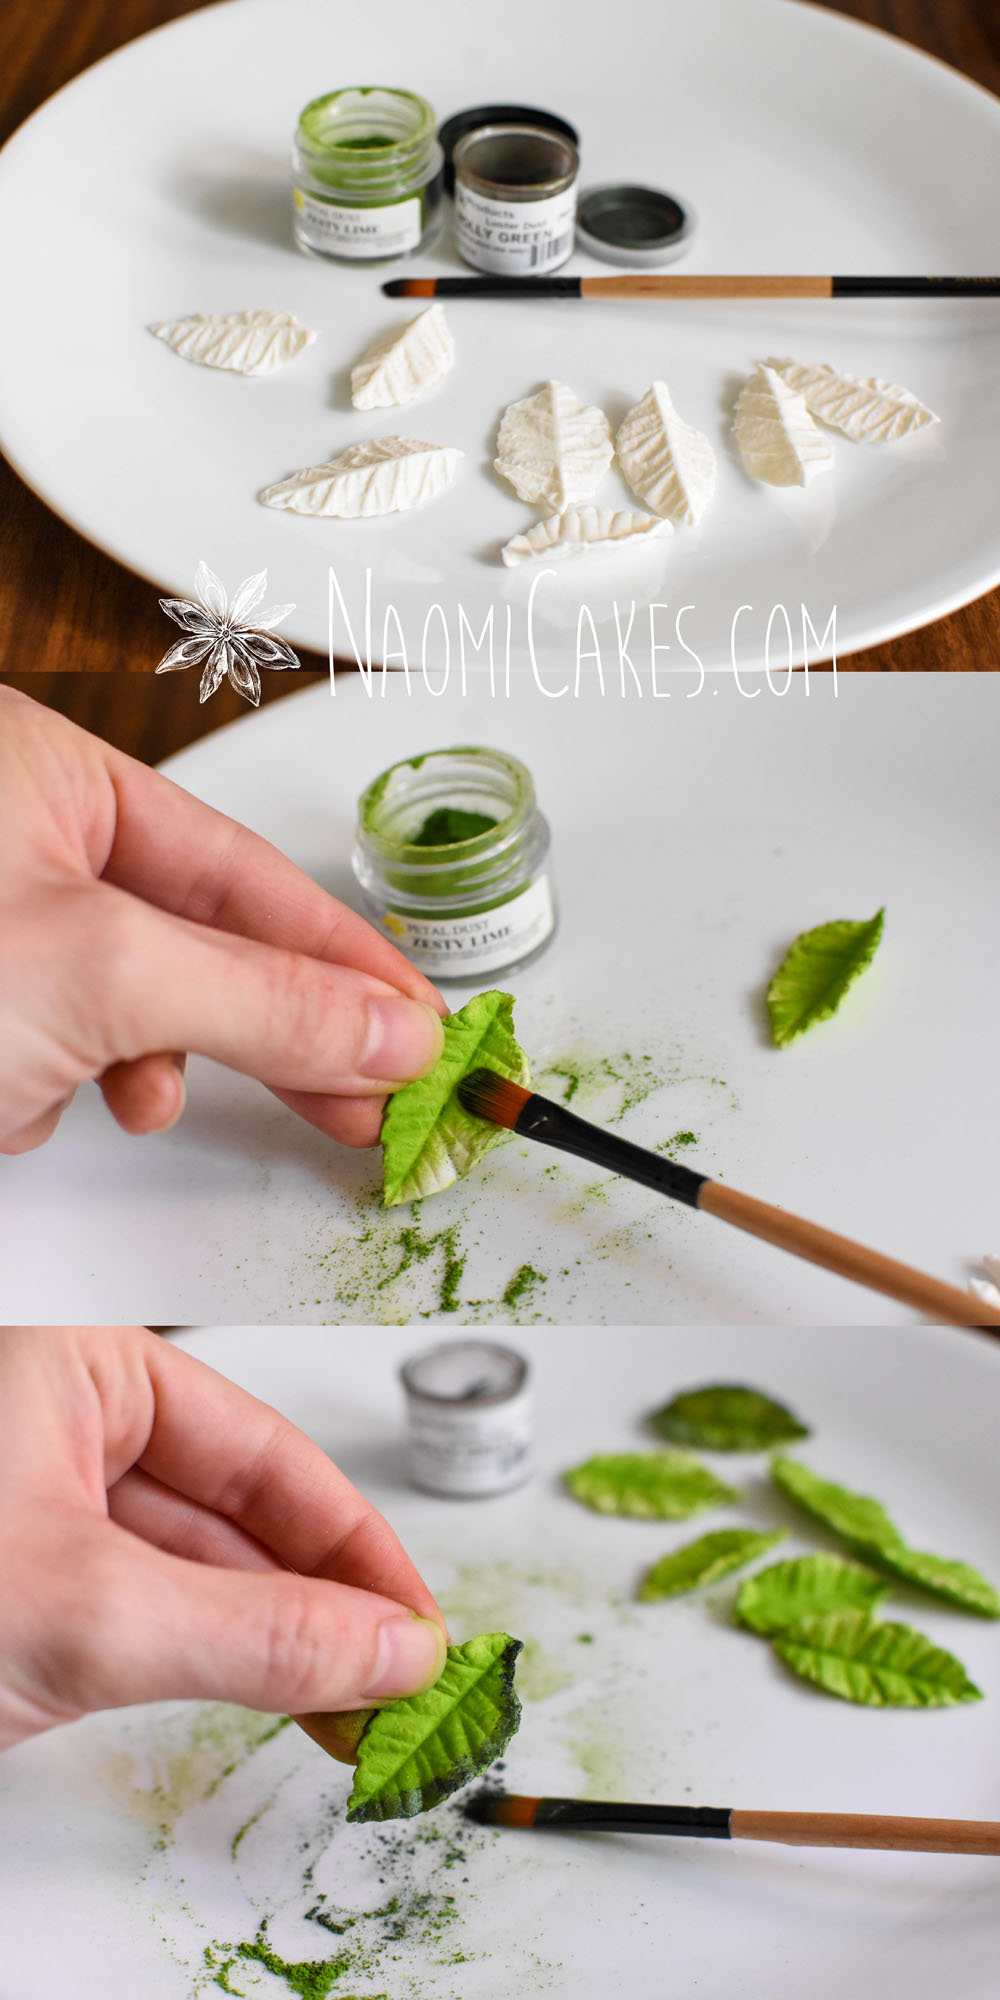
Set up your station
-
Clean your work area, and assemble your supplies. If you want to make sure your clothes are protected from petal dust, make sure to put on an apron before you begin.
Color the leaves
-
Working over the plate, gently brush the base (lighter) colour onto the leaves, starting with the back of the leaf and then moving to the front, until the colour is rich and full. From there, brush the centre vein of the leaf and the edges with your darker colour, and then blend the two together until they mesh smoothly. I usually only apply the dark colour to the front of the leaves, or minimally to the backs as well.
Tips & tricks
-
1. To make your color more muted (not as strong), you can mix it with cornstarch to apply the color in a less prominent/softer way. This is a great way to achieve a lighter color.
-
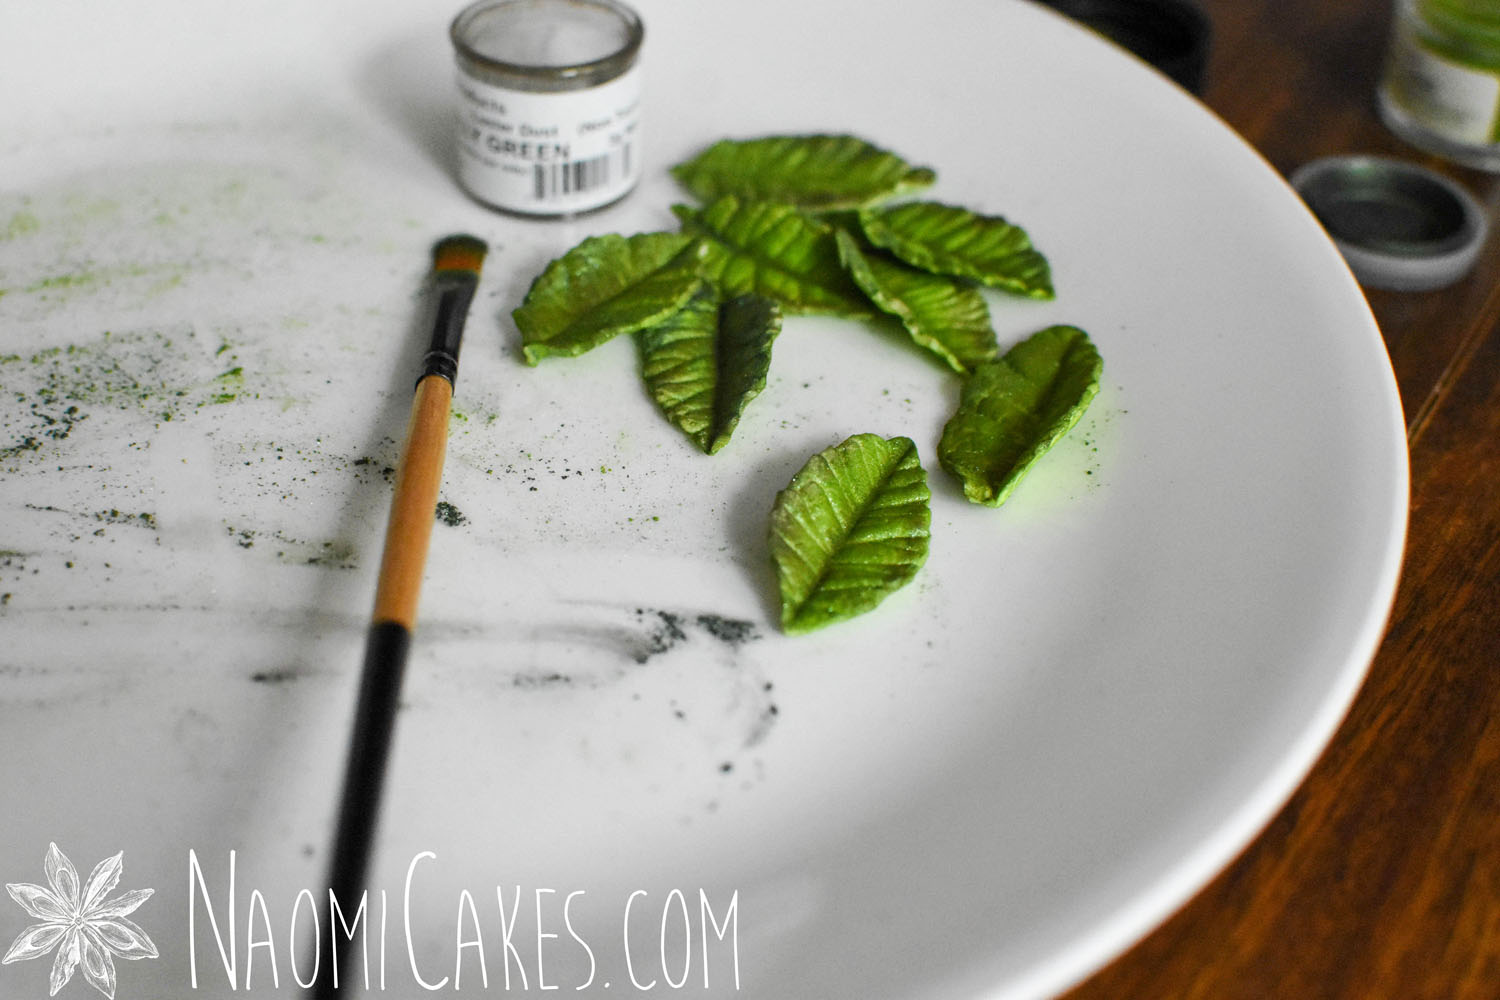
2. Use the petal dust that falls onto the plate from both colours to blend the two colours together and fill in any gaps.
-
3. Clean your work surface with a damp paper towel before using a kitchen rag. This will pick up most of the dust that might have gotten onto the table, and protect your kitchen cloths from color stains.
How to color your gum paste leaves with petal dust
1 – Set up your station
Clean your work area, and assemble your supplies. If you want to make sure your clothes are protected from petal dust, make sure to put on an apron before you begin.
2 – Color the leaves
Working over the plate, gently brush the base (lighter) colour onto the leaves, starting with the back of the leaf and then moving to the front, until the colour is rich and full. From there, brush the centre vein of the leaf and the edges with your darker colour, and then blend the two together until they mesh smoothly.
I usually only apply the dark colour to the front of the leaves, or minimally to the backs as well.

3 – Tips & tricks
Here are a couple of tips to make this process easier for you:
- To make your color more muted (not as strong), you can mix it with cornstarch to apply the color in a less prominent/softer way. This is a great way to achieve a lighter color.
- Use the petal dust that falls onto the plate from both colours to blend the two colours together and fill in any gaps.
- Clean your work surface with a damp paper towel before using a kitchen rag. This will pick up most of the dust that might have gotten onto the table, and protect your kitchen cloths from color stains.

Obviously, depending on the type of leaf you’re painting, you’ll want to go for a green that’s more like the color of that plant in real life; but I think you’ll find it’s pretty easy to find variety out there in the world of petal dusts!
If you can’t find what you need at your local arts and crafts store (or on Amazon), you can also check out some online cake decorating supply retailers (like Global Sugar Art). There are many options out there to choose from!
If you like this tutorial, you may also like:
- Gum Paste Roses – The Base, Part 1/5 [Tutorial]
- Gum Paste Roses – The Rose Bud, Part 2/5 [Tutorial]
- Gum Paste Roses – The Medium Rose, Part 3/5 [Tutorial]
- Gum Paste Roses – The Full Rose, Part 4/5 [Tutorial]
- Gum Paste Roses – Tinting the Roses, Part 5/5 [Tutorial]
- Basic Piping Techniques for Cake Decorating [Tutorial]
- How to Frost a Cake with Buttercream (Smooth Finish) [Tutorial]
I hope this tutorial serves you well! Let me know what you’re making in the comments, or even if you just enjoyed the “How to” of this process. I have always found reading about this kind of thing so interesting, even if I never intend to make it; it’s incredible what people can do, and learning the ways that they do it is so fun!
As always, feel free to tag me in your gum paste photo posts on Instagram @naomicakesofficial – I always enjoy seeing what you guys are making, and knowing that my tutorials are benefiting someone always makes my day!
What have you made from gum paste before? Let me know in the comments!
Thanks for stopping in!
Bye for now,
–Naomi
This post contains affiliate links.
Im looking for tutorial.of.dusting which one is better the luster dust or the tint powder
Hi Josephine!
If you’re looking for realistic looking flowers, petal dust is the way to go! If you want intense shimmer, use lustre dust— or somewhere in between, use petal dust first and then lustre on top.
Petal and lustre dust work the same, they just have different colour quality.
Thanks for your comment!
Naomi