
Yellow Tow Truck Toddler Birthday Cake [Tutorial]
For his 2nd birthday, my little boy Albert asked me to make him a “Lellow cho-chuck cake.” (To translate, a “Yellow tow truck cake.”) I ended up making this super simple buttercream cake to fulfill his little dreams, and let me tell you – it was a hit!
The yellow tow truck cake was everything he hoped it would be, and I’m happy to say that it wasn’t very hard to pull together either. So, to make it replicable and bring you all a new tutorial, I’m excited to share these notes with you today!

In this post
- Making the cake: some notes
- Decorating with buttercream
- Preparing ahead (Cake/Frosting/Decorating)
- Tow truck pattern
- Helpful tools
- Making this project easy for busy moms
- You will need
- Printable Tutorial
- How to make a tow truck toddler birthday cake
- Other great recipes/tutorials
Making the cake: some notes
To start off, for this tutorial, you’re going to need to bake yourself an 8″ square cake in a decorator pan (which will serve about 8 people). For this post, I used my Simple Chocolate Cake Recipe, but you can use just about any cake recipe with great results.
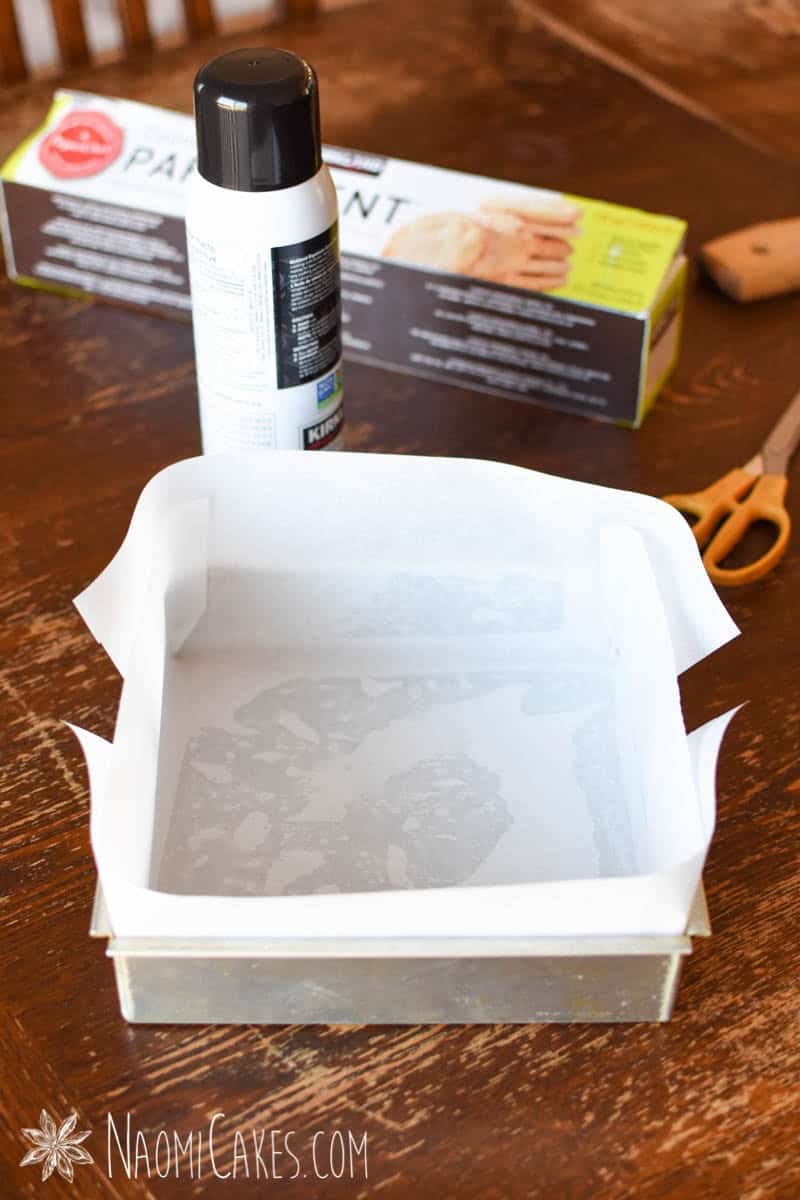
To make sure your cake comes out of the pan easily, I recommend using this tutorial for How to Line Cake Pans with Parchment Paper, to make sure your cake doesn’t break and that it has nice, clean, sharp edges.
Decorating with buttercream
Buttercream frosting is one of the best types of icing for tinting and decorating fun cakes. It’s a sweet, creamy frosting with a buttery undertone and really good structure.
I’ve written a couple of tutorials in the past for tips on how to frost a cake with buttercream and also some basic piping techniques. Make sure to check those out if they would be helpful to you!

Preparing ahead
The cake
To prep this cake ahead of time, I always recommend baking the cake in advance and freezing it. To do this, you can bake the cake, cool it, and trim it as directed in the tutorial below. Then, wrap each piece of cake in plastic wrap and store it in a sealed container in the freezer until you’re ready to decorate it.
This cake is made with my Moist Chocolate Cake recipe.
The frosting
The frosting for this cake is made with my Easy Vanilla Buttercream Recipe on the outside and my Dark Chocolate Buttercream on the inside (using regular cocoa powder instead of black cocoa powder).
You can prep this icing ahead, and store it in the fridge or freezer in an airtight container until ready to use. Bring the frosting to room temperature before use, and ideally, mix it up a little bit (to smooth it out) before you start spreading it.
The decorating
You can go ahead and decorate this cake from frozen (no need to thaw it first). This makes for easy decorating! Make the frosting and chocolate ahead, or save it till the day you want to decorate the cake.
Tow truck pattern
The majority of this cake doesn’t require any kind of template or pattern, but I have created one for the back of the truck with the hook. You can download that for free here.
Helpful tools
To make this cake, there are a number of helpful tools I can recommend to make the process more smooth. Here’s what I suggest:
Cake decorator pans
Cake decorator pans are unique in that they have straight sides/edges. This makes it so much easier to decorate the cake with clean, sharp edges and little to no waste!
For this tutorial, I am using an 8″ square decorator cake pan.
Stand mixer
I once had a friend ask me if it was worth it to put a stand mixer on her bridal registry. The short answer is—YES!
While you can use a hand mixer for the frosting in this cake tutorial, using a stand mixer is just so easy and gives you free hands while the mixer does its work. As a busy mom of 5, and also as a multi-tasker, I love this.
Cake leveller
A cake leveller is a tool used to make perfectly flat/even cake layers. While you can accomplish the same job with a long serrated knife, this tool is a must for anyone who loves to make cakes that look professional and well-done (without the stress of accidentally cutting a top that should be straight on an angle).
Disposable piping bags
Disposable piping bags make the job of piping icing and chocolate so much easier! If you can manage it, I recommend getting these to make the whole project just a bit more fun and a lot less stressful.
Gel food coloring
Gel food coloring is amazing because it won’t affect the texture of your icing too much. It’s also usually a really concentrated, bold color—meaning you only need a few drops to get a vibrant, beautiful colored icing.

Making this project easy for busy moms
As a mom of 5 kids (5 and under), I totally get that making a cake like this can feel pretty intimidating. When is one supposed to find the time??
Honestly, the key is to work ahead (as noted above), make sure you have what you need, and to make sure you’ve read through the instructions well ahead of time. This way you know exactly what you’re signing up for, and you can plan when the best time would be to make it happen. For me, nap time is golden hour: making this cake while the littlest kids are resting is how I can make this possible.
You will need:
Baking the cake:
- Stand mixer or hand mixer OR
- Mixing bowls and a large whisk
- Measuring cups and spoons
- Parchment paper
- Scissors
- 8″ square decorator cake pans (straight sides/edges)
- Cooling rack
- Plastic wrap (for storage)
For the icing:
To make the tow truck cake
- Baked 8″ chocolate cake
- 1 batch chocolate buttercream
- 1 batch vanilla buttercream
- Cookie sheet (to work on)
- Cake leveller
- Serrated knife
- Spatula
- Stand mixer or hand mixer
- Mixing bowls
- Kitchen spoons (regular tablespoons are great)
- Palette knife
- Piping bags
- Piping tips/couplers
- Scissors
- Parchment paper
- Double boiler or glass bowl and microwave
- Gel food coloring
- Melting chocolate
- Yellow M&M’s or Rees’s Pieces
- 4 Oreo cookies (for the tires)
- Butcher’s twine or floral wire
- 12″ cake platter (to serve)
Printable Tutorial

How to make a tow truck toddler birthday cake
Here's the tutorial, step-by-step (with pictures)! Make sure to check out the actual online tutorial for clear step-by-step images.
Ingredients
- 1 baked 8" chocolate cake
- 1 batch chocolate buttercream
- 1 batch vanilla buttercream
- 1 cookie sheet to work on
- 1 cake leveller
- 1 long serrated knife
- 1 spatula
- 1 stand mixer or hand mixer
- Mixing bowls
- Kitchen spoons regular tablespoons are great
- 1 Palette knife
- Piping bags
- Piping tips/couplers optional
- 1 pair Scissors
- Parchment paper
- Double boiler or glass bowl and microwave
- Gel food coloring (red, blue, yellow, and black)
- 1 c. Melting chocolate
- 4 Yellow M&M’s or Rees’s Pieces
- 4 Oreo cookies for the tires
- Butcher’s twine or floral wire
- 1 12-inch cake platter to serve
Instructions
1 – Prepare the cake and frosting
-
For this tutorial, I will assume that you have made an 8" square chocolate cake and a single batch recipe of chocolate buttercream and vanilla buttercream (see blog post for recipe links).
2 – Trim the cake and split the layers
-
Using a long serrated knife or a cake leveller, trim the top off of the cake to make a perfectly flat surface.
-
Cut the cake in half evenly, and split the halves to make 2 layers for each half of the cake.
Fill & assemble the tow truck cake
-
Spread a thin layer of frosting between each cake layer to make 2 small rectangle cakes with chocolate frosting between the layers of each.
-
Cut about 1/3 (or a little more) off of one of the rectangles. This will be the front of the truck.
-
Gently cut the piece of cake you just separated (the smaller portion) on an angle from about the half-way point on the top to the bottom corner (see picture to understand this step more fully).
-
Spread a little bit of chocolate frosting on the top of your other rectangle piece of cake. Fasten the larger angled cut piece on top to make the top of the tow truck.
-
Cut another small slice of cake off of the trimmed piece (about 1" wide, or maybe a little smaller), and fasten one of the two layers onto the back of the head of the truck (see photo).
-
Set the cake onto a sheet of plastic wrap, and spread a thin layer of chocolate buttecream over the whole surface of the tow truck with a palette knife. Wrap in plastic, and refrigerate until set (at least 1 hour).
4 – Make the chocolate two truck hook
-
While the cake is chilling, make the tow truck hook and its mount. Print my tow truck hook template, and set it onto a cookie sheet with a piece of parchment paper on top.
-
In a double boiler (or a glass bowl in the microwave for 15 second bursts, stirring between each), melt about 1 cup of melting chocolate until smooth. Spoon the chocolate into a piping bag, and use a pair of scissors to snip off a little hole at the tip. Pipe the shapes on the tow truck template.* Allow to rest in the fridge until completely set, about 10-15 minutes.
-
Remove the chocolate pieces from the fridge. Stick the 3 triangles together with a bit more melted chocolate (with the short edges attaching to the small triangle in the middle, and the long ends of the larger triangles attaching to each other).
-
Fasten the two hooks together with melted chocolate, with the flat sides against each other. Set the chocolate pieces aside.
5 – Tint the icing
-
Mix the icing colors according to the amounts below, and spoon into piping bags.
-
For a more polished look than I have in these pictures, use a piping tip #3 for the white, red, and blue bags, and a piping tip #2 for the black bag. The yellow and brown bags do not require a piping tip.
-
From one batch of vanilla buttercream, you will need:
2 Tbsp white icing
2 Tbsp blue icing
2 Tbsp red icing
(Tint the remainder of the vanilla icing yellow)
-
From one batch of chocolate buttercream, you will need:
1/4 c. black icing (chocolate buttercream tinted with black gel food coloring)
1/2 c. chocolate icing
6 – Frost the cake with yellow icing
-
Set the chilled cake onto a large serving platter.
-
Fill a 12-18" piping bag with yellow icing. Cut off the tip, and pipe the icing over the whole surface of the cold truck cake. Use a palette knife to gently spread the icing evenly over the whole surface.
7 – Truck bed, tires, windows and doors
-
Use the piping bag with chocolate icing to pipe frosting into the back of the truck and over the piece of cake at the back (as pictured).
-
Use the black chocolate icing to pipe the shapes of the windows, doors, and frame of the truck (as pictured).
-
Use the white icing to fill in the jagged lines (shine) on the windows (as pictured).
8 – Add lights, decorative stripe, and a license plate
-
Use the red frosting to pipe lights, the blue for a decorative stripe down the side of the truck, and the white for a license plate. Since my little guy's name is Albert and he turned 2 for this birthday, I piped the license number "A2" on the back of his truck with the black chocolate frosting.
-
Add yellow M&M's or Rees's Pieces to the truck's lights, front and back.
9 – Assemble the hook on the bed of the truck
-
Gently press the chocolate mount onto the back of the truck, and thread a little string or wire through the top of the mount (you will have to use a toothpick to make a hole for the string). Attach the hook to the string/wire.
IMPORTANT! The #1 rule of cake decorating is that as much as possible of the materials you use should be edible. Since this is a child's birthday cake, if you do use wire (as I did), be sure to remove and discard the wire before any child has access to it as it is not a safe material for them to be handling.
10 – Storage and Serving
-
Your fully assembled tow truck cake should be kept at cool room temperature until serving, or in the fridge.
Note: If you keep the cake in the fridge, the chocolate hook may "sweat" (become tacky with condensation) once it comes out, especially in warmer weather.
-
Remove the wired hook and discard the wire. Slice the cake and serve.
How to make a tow truck toddler birthday cake
Here’s the tutorial, step-by-step (with pictures)! If you have any questions about any of the instructions below, feel free to drop a comment. I’d love to help, and your feedback helps me to make my tutorials more clear.
1 – Prepare the cake and frosting
For this tutorial, I will assume that you have made an 8″ square chocolate cake and a single batch recipe of chocolate buttercream and vanilla buttercream.
You can use any recipe for these, or go ahead and check out my recipes at the links above.
2 – Trim the cake and split the layers
2.1 – Using a long serrated knife or a cake leveller, trim the top off of the cake to make a perfectly flat surface.


2.2 – Cut the cake in half evenly, and split the halves to make 2 layers for each half of the cake.


3 – Fill & assemble the tow truck cake
3.1 – Spread a thin layer of frosting between each cake layer to make 2 small rectangle cakes with chocolate frosting between the layers of each.


3.2 – Cut about 1/3 (or a little more) off of one of the rectangles. This will be the front of the truck.

3.3 – Gently cut the piece of cake you just separated (the smaller portion) on an angle from about the half-way point on the top to the bottom corner (see picture to understand this step more fully).


3.4 – Spread a little bit of chocolate frosting on the top of your other rectangle piece of cake. Fasten the larger angled cut piece on top to make the top of the tow truck.


3.5 – Cut another small slice of cake off of the trimmed piece (about 1″ wide, or maybe a little smaller), and fasten one of the two layers onto the back of the head of the truck (see photo).

3.6 – Set the cake onto a sheet of plastic wrap, and spread a thin layer of chocolate buttecream over the whole surface of the tow truck with a palette knife. Wrap in plastic, and refrigerate until set (at least 1 hour).


4 – Make the chocolate two truck hook
4.1 – While the cake is chilling, make the tow truck hook and its mount. Print my tow truck hook template, and set it onto a cookie sheet with a piece of parchment paper on top.


4.2 – In a double boiler (or a glass bowl in the microwave for 15 second bursts, stirring between each), melt about 1 cup of melting chocolate until smooth. Spoon the chocolate into a piping bag, and use a pair of scissors to snip off a little hole at the tip. Pipe the shapes on the tow truck template.* Allow to rest in the fridge until completely set, about 10-15 minutes.
*You may notice that the smaller triangle in the pictures has an additional shape below it; my printable template does not include this piece because it is not needed for this tutorial.

4.3 – Remove the chocolate pieces from the fridge. Stick the 3 triangles together with a bit more melted chocolate (with the short edges attaching to the small triangle in the middle, and the long ends of the larger triangles attaching to each other).
4.4 – Fasten the two hooks together with melted chocolate, with the flat sides against each other. Set the chocolate pieces aside.

5 – Tint the icing

Mix the icing colors according to the amounts below, and spoon into piping bags.
For a more polished look than I have in these pictures, use a piping tip #3 for the white, red, and blue bags, and a piping tip #2 for the black bag. The yellow and brown bags do not require a piping tip.
From one batch of vanilla buttercream, you will need:
- 2 Tbsp white icing
- 2 Tbsp blue icing
- 2 Tbsp red icing
- Tint the remainder of the vanilla icing yellow
From one batch of chocolate buttercream, you will need:
- 1/4 c. black icing (chocolate buttercream tinted with black gel food coloring)
- 1/2 c. chocolate icing


6 – Frost the cake with yellow icing
6.1 – Set the chilled cake onto a large serving platter.
6.2 – Fill a 12-18″ piping bag with yellow icing. Cut off the tip, and pipe the icing over the whole surface of the cold truck cake. Use a palette knife to gently spread the icing evenly over the whole surface.


7 – Truck bed, tires, windows and doors
7.1 – Use the piping bag with chocolate icing to pipe frosting into the back of the truck and over the piece of cake at the back (as pictured).


7.2 – Use the black chocolate icing to pipe the shapes of the windows, doors, and frame of the truck (as pictured).


7.3 – Use the white icing to fill in the jagged lines (shine) on the windows (as pictured).

8 – Add lights, decorative stripe, and a license plate
8.1 – Use the red frosting to pipe lights, the blue for a decorative stripe down the side of the truck, and the white for a license plate. Since my little guy’s name is Albert and he turned 2 for this birthday, I piped the license number “A2” on the back of his truck with the black chocolate frosting.
8.2 – Add yellow M&M’s or Rees’s Pieces to the truck’s lights, front and back.


9 – Assemble the hook on the bed of the truck
Gently press the chocolate mount onto the back of the truck, and thread a little string or wire through the top of the mount (you will have to use a toothpick to make a hole for the string). Attach the hook to the string/wire.
IMPORTANT! The #1 rule of cake decorating is that as much as possible of the materials you use should be edible. Since this is a child’s birthday cake, if you do use wire (as I did), be sure to remove and discard the wire before any child has access to it as it is not a safe material for them to be handling.


10 – Storage and Serving
Your fully assembled tow truck cake should be kept at cool room temperature until serving, or in the fridge.
Note: If you keep the cake in the fridge, the chocolate hook may “sweat” (become tacky with condensation) once it comes out, especially in warmer weather.
Remove the wired hook and discard the wire. Slice the cake and serve.


If you like this tutorial, you may also like:
- Easy White Vanilla Buttercream
- Dark Chocolate Buttercream
- Simple Moist Chocolate Cake
- Raspberry Sponge Cake
That’s all for today! If you use this tutorial, please show off your work and tag me in your pictures on Instagram @naomicakesofficial! I’d love to see your adorable cakes!
Bye for now,
Naomi
This post contains affiliate links.
That’s amazing Naomi! He must have been thrilled!
Thanks Jerrica, he did love it!