
Easy Homemade Pizza Crust [Recipe]
This is one of the simplest pizza crust recipes you’ll ever make. It makes a super stretchy dough that spreads out for easy, delicious, homemade thin crust pizza.
I’ll tell you straight off the bat, it does take some advance planning because the dough needs to rest for a little while for best results; however, the fact that you can make this dough and freeze it is such a plus! It makes it so, so simple to have delicious, “real” pizza ready to go quickly!
Is it hard to make homemade pizza?
I always think of pizza as being kind of a big production to make; but actually, it’s not! Especially if you make the crust ahead of time and freeze it, making pizza can be one of the easiest, fastest meals to pull together.
How long does it take to make homemade pizza?
Pizza can be extremely fast to make, provided that you plan ahead. Make the dough or pull it out of the freezer in the morning, and then let it rest or thaw on the counter. After 6-8 hours of resting, it’s ready to cover with toppings; which, if those things are prepared ahead, takes 5 minutes or less. After that, all that’s left is baking– which only takes 15-20 minutes!
The long and the short of it is this: Pizza is quick to make if you plan ahead and make sure that your ingredients are ready. The fastest way to pull it together is to purchase pre-sliced pepperoni and pre-grated mozzarella cheese. The rest is very simple.

Can you make pizza crust ahead of time?
Yes, and that’s one thing I love about this recipe. You can make it at the beginning of the day and let it sit until dinner time, OR you can make it weeks ahead and freeze it in pre-portioned sections. Then, pull it out, spread it out, and bake it with your favourite toppings.
How to freeze pizza dough
This recipe is great for freezing pizza crust. All you need to do is prepare it according to the recipe directions, let it rise, and then portion it into sections, wrap it in plastic, and put it into a ziploc bag or freezer safe container.
Thawing frozen pizza dough
My favourite way to thaw pizza dough is to pull it out of the freezer the morning of the day that I want to use it (usually between 8-10am).
I freeze my dough wrapped in plastic, so to thaw it for dinner that night, I just lightly grease a bowl, set the frozen piece of (unwrapped) dough into it, and then place the plastic back on top of the dough to keep it from drying out as it rests. Keep the dough at room temperature until around 4:30-5pm, at which point it can be made into pizza for dinner.

What kind of flour to use for pizza dough
Pizza dough has the best workability when it is made with strong gluten flour. To keep things simple, I usually just make my dough with all purpose flour. However, you can use any type of strong bread or pizza flour for this recipe.
How to handle pizza dough
If you’re a beginner, you may think that you want to try tossing in the air like the pros. However, if you’re anything like me, you might find that particular skill a little bit more difficult than you imagined. That said, here’s how I handle my pizza dough – To make great pizza crust that doesn’t tear and doesn’t need to be rolled out.
- Don’t punch the air out of the dough.
Turning the dough out of the bowl onto the counter will cause it to deflate quite a bit, and handling it will further remove excess air bubbles. Leaving the air bubbles in will also keep the dough more relaxed and ready to be stretched, which helps a lot when you’re making pizza. - If you shape a section of dough into a circle, let it rest (covered) for 5-10 minutes before shaping your pizza.
I like to divide my dough into 1-pizza sized portions and let it completely relax before I shape them. - Stretch the dough out with your hands, and let gravity do some of the work.
I like to hold the dough up sideways, stretching the edges out with my hands and fingers while I rotate the dough. As you turn the dough, gravity will pull it down and allow it to stretch even thinner!
How to keep pizza crust from sticking
I like to shape my pizza dough primarily in my hands or on a lightly floured work surface, with a bit of extra flour to keep it from sticking.
Once the dough is ready to bake, I like to flour my pizza pans with a bit of durum semolina flour (looks like a fine cornmeal) to prevent the pizza from sticking. You can also use parchment paper (as in these pictures) if you want to be extra sure.

Is it necessary to use a pizza stone?
No! Pizza stones are amazing and definitely yield a great result, but you can honestly just bake your pizzas on some large round pizza pans or even cookie sheets. They don’t need to be fancy to yield some delicious pizza!
To make this pizza dough, you will need:
- Ingredients (see recipe card)
- Mixing bowls or a Stand mixer
- Measuring cups and spoons
- Kitchen scale (optional)
- Miniature sieve (optional)
- Plastic wrap or tea towels (to cover)
- Ziploc bags or freezer safe storage containers (if you’re making your dough ahead)
To make pizza:
- Cutting board
- Sharp knife
- Bowls for your toppings
- Can opener (for the sauce, unless making your own)
- Pizza stone, Pizza pan, or Cookie sheet
- Pizza cutter, to serve (optional)
Scroll down to the bottom for pizza recipe & directions; immediately below is just the crust recipe.


Easy Homemade Pizza Crust
A quick, simple pizza crust recipe that can be frozen for later use. Just make your dough ahead of time, thaw, and then have pizza crusts ready to go in just 5 minutes!
Ingredients
- 2-1/2 cups lukewarm water
- 7 cups all purpose flour 7 cups = 1kg
- 2 tsp dry active yeast
- 6 Tbsp olive oil extra virgin
- 1 Tbsp salt
Instructions
To make the dough by hand:
-
Combine all ingredients in a large mixing bowl. Stir until the mixture becomes difficult to bring together, and then turn the mixture out onto a lightly floured work surface to knead by hand. Knead 10-15 minutes or until smooth and elastic. Turn into a greased bowl, cover with plastic, and set aside. Allow to rest 4-6 hours before using.
To make the dough in an electric mixer:
-
Combine all ingredients in the bowl of an electric mixer. Mix on low-medium speed with the dough hook for 10 minutes. Turn the dough into a greased bowl, and allow to rest 4-6 hours before using.
-
After the dough has rested for 4-6 hours, divide it into 4 equal portions (no need to punch it down. If you only need one portion of the dough at a time, you can set the one aside and flatten the others out to remove air bubbles. Then shape the extra pieces into discs, wrap them in plastic, and put them inside of a ziplock bag or airtight container. Freeze the extra pieces until you want to use them.*
To make pizza:
-
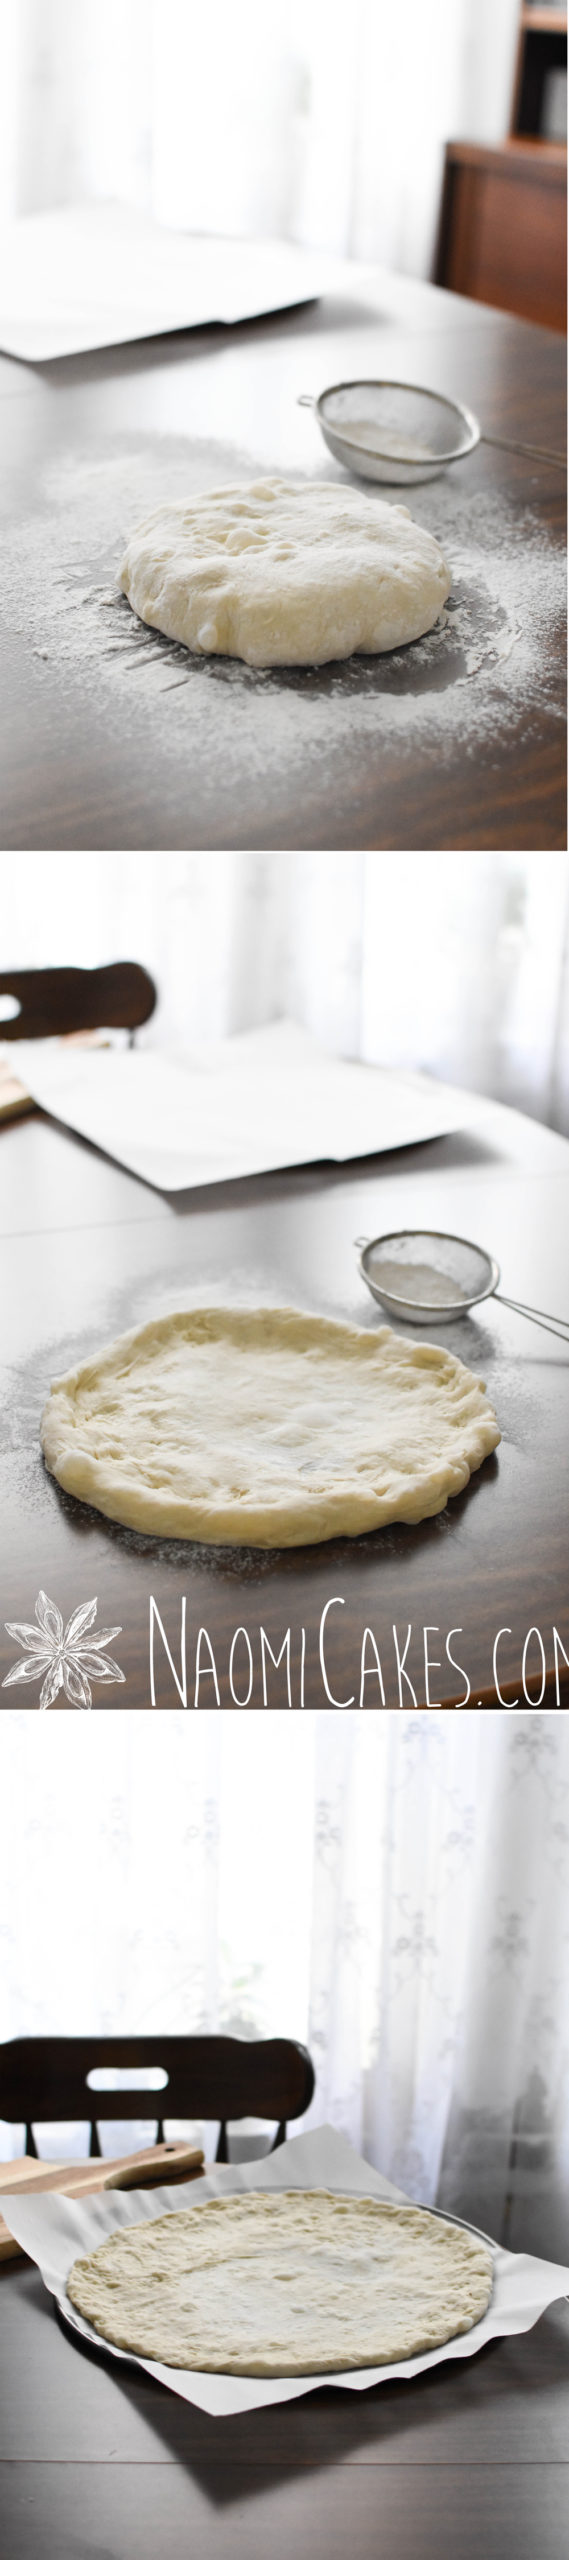
To shape your pizza, turn your reserved portion of dough out onto a lightly floured work surface, and begin stretching it from the centre outwards with your hands into a large, 12"-14" circle.
Note: I like to spread it out on the table to about an 8" circle, and then pick it up from the centre of the dough, allowing my hands to slide out to the edge of the circle with gravity pulling the dough down. Rotate the dough in your hands, running your hands along the outside of the circle, until the dough stretches into a large circle. Keep it moving fairly quickly, to prevent it from tearing.
If you do get a little hole it in at any point, just put the piece of dough back on the table, pinch it back together, and keep working the dough until it reaches about 12"-14" diameter circle.
-
Top with sauce and pizza toppings; bake on a pan or pizza stone at 450 degrees F for 15-20 minutes, or until golden.
Recipe Notes
- I find that this dough comes out of the freezer very well! Making this ahead of time can make some pretty speedy pizza nights in the days ahead… and even more so if you prep & freeze your sauce in advance as well!
- To make pizza from frozen crust: Take the crust out of the freezer the morning of the day you want to use it. Unwrap it, set it in a lightly greased bowl, and loosely cover with the plastic it was wrapped in. Allow the dough to thaw and rest until using, about 8-12 hours.
- How soon you can make pizza after mixing up this dough: I have made this into pizza as early as 2 hours after mixing up the dough; however, allowing it to rest for the proper amount of time will make your workability much easier. Also, when you shape your crusts, do not bother punch the air out of the dough; working the dough too much will cause it to become less relaxed, which will make stretching it into shape more difficult.
- Preheating your pan or pizza stone will help the crust bake better. The simplest way to do this is to prepare your pizza crust on a piece of parchment paper, preheat your pan in the hot oven for 5 minutes (or pizza stone for 10-15 minutes), and then use another pan or cutting board to slide the pizza onto the hot pan in the oven. You don’t have to use parchment (a well floured surface will work just fine), but if you’re nervous about it sticking, using the paper is a simple way to make sure it gets in there smoothly!


How to make the pizza in these pictures:
- Drizzle the crust with a bit of olive oil, and spread it evenly over the surface with a pastry brush. Sprinkle with salt and freshly ground black pepper. (You can also do some parmesan cheese around the edges if you like.)
- Mix 1 can of tomato paste (small can) with about 1/4 cup water and 2 Tbsp olive oil. Season to taste with salt, pepper, garlic powder, and oregano.
- Spread 1/2 the tomato sauce mixture onto the surface of the pizza; stick the rest into a container to freeze for next time.
- Scatter with the following toppings:
1/4 onion, sliced
4-6 mushrooms, washed and sliced
6-7 strips bacon, chopped into small pieces and fried until crispy
1/3 brick mozzarella cheese (2-3 cups grated, probably about 250-300g)


A question for you:
What are your favourite pizza toppings? Let me know in the comments!
As always, if you make this recipe, please tag me in your photos on Facebook @naomicakes or Instagram @naomicakesofficial! I would love to see your awesome work!
Bye for now,
Naomi
This post contains affiliate links.