
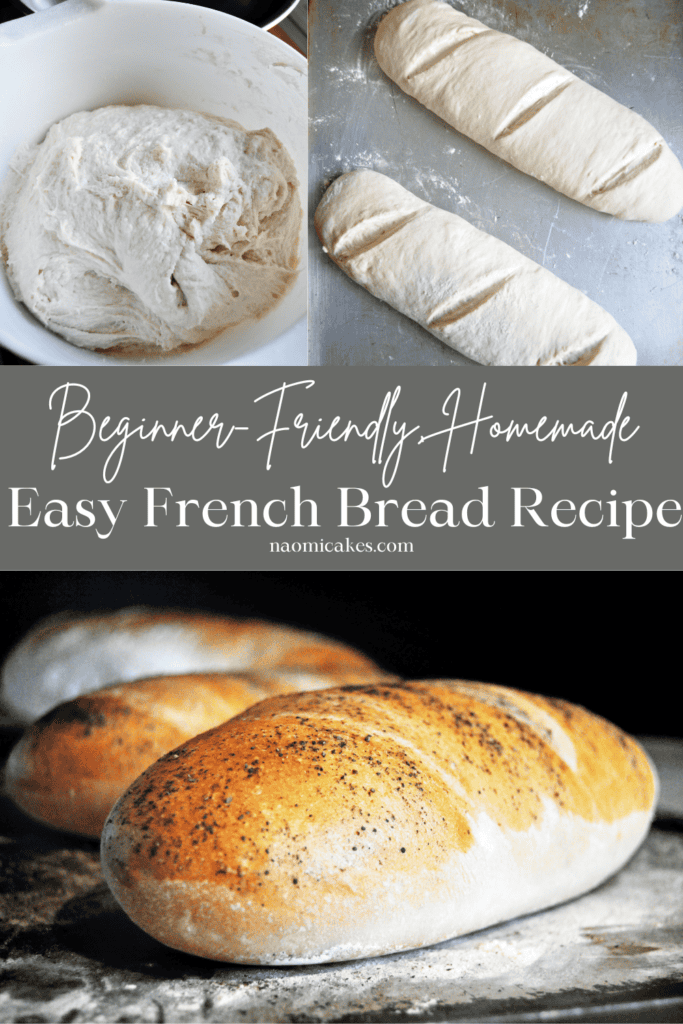
Easy French Bread [Recipe]
Today I want to share with you all one of my all time favourite recipes ever: Easy French bread. I learned how to make this bread as a 12-year old, so needless to say it lives up to its name!
How I came to know this recipe
I’m one of 12 kids, and growing up in a large family, we were blessed to be have a mother who made homemade bread all the time. I think I took it for granted most of the time, but having had seasons of life where homemade bread wasn’t always available, I’ve only grown to appreciate the delicious taste and smell of homemade bread more and more. This recipe is one of my favourites from my growing up years because of how easy to make and delicious to eat it is. I’m certain it will be that for you as well!
Is this bread easy to make for a beginner?
You bet! As I mentioned above, I started making this when I was 12, and even the batches I thought I ruined somehow magically turned out delicious. This is the very best recipe to begin learning how to make bread on your own!
Can I adapt this recipe to make other kinds of bread?
Yes! This recipe can be used as a base for just about every type of bread you want to make. Tweak it by adding whole wheat flour to make it into whole wheat bread, or add oats, nuts, or seeds for a little texture. Just make sure you add your “Extras” to the water before you start adding the flour to stiffen it up. You can also easily make this recipe into dinner rolls instead, if you prefer.
What is French bread?
French loaves are actually more of a shape than a recipe. They are typically white bread, shaped in long loaves with angled cuts along the length to produce a very beautiful, large, baguette-looking loaf. I imagine the most “legit” French breads would be fermented like sourdough, but any French-shaped loaf can go by this name.

Is this recipe made with traditional yeast?
Yes! As I mentioned above, I imagine that the most incredible French loaves would be fermented (like sourdough), to make that amazing crispy crust and porous interior. This recipe won’t give you quite that result, but it does keep things much simpler and faster to make, while still being incredibly delicious!
How long does it take to make French bread?
I give myself 3 hours to make it from start to finish. If you start in the morning, you can have fresh bread form the oven by lunchtime!
Is French bread difficult to make?
Not at all. This is the best place to begin learning how to make bread and getting a feel for what it means to knead and shape dough. It’s forgiving, it’s simple, and it’s fast!
What are the best uses for French bread?
This bread makes incredible sandwiches, appetizers, bread for dipping in oil and vinegar… pretty much everything. Whatever you want to eat bread for, this will serve you well.
Some good toppings for French bread are…?
I have usually just glazed my loaves with an egg wash to give a nice shiny finish, but you can use everything bagel seasoning, poppy seeds, sesame seeds… you name it. Pretty much anything can be sprinkled on top of this bread to make it great!
Getting a crispy crust on your bread
The best way to get a crispy crust is to create steam in the oven. You can spray your loaves with water or brush them with water before baking to give a little bit of a thicker crust, or if you want to pour boiling water into a pan underneath the loaves when you place them in the oven to bake, you should get a better, thicker crust.
How is French bread made?
Well, that’s the big question, isn’t it? Scroll down for the recipe!
Easy French Bread
Ingredients
- 1/2 c. lukewarm water
- 1/2 tsp. sugar
- 1 Tbsp. or 1 pkg. dry active yeast
- 2 c. lukewarm water
- 2 Tbsp. sugar
- 2 tsp. salt
- 2 Tbsp. oil
- 5+ cups all-purpose flour* (approx.) *see recipe notes
- 1 egg mixed with 1 tsp. cold water to glaze
Instructions
-
In a large drinking glass or measuring pitcher, combine the 1/2 c. lukewarm water with 1/2 tsp. sugar and dry active yeast. Stir to combine and let this rest about 10 minutes, till risen and bubbly.
-
Note: Careful not to use hot water! If the water is too hot, it will kill the yeast and you'll have to start again. Allowing the yeast to rise in the cup, separate from the rest of the ingredients, is to test the yeast and make sure it's rising well. This prevents wasting your other ingredients, should you have to start again.
-
While the yeast is rising, combine the rest of the water, salt, sugar, and oil in a large bowl or the bowl of an electric mixture. Add the risen yeast mixture and about 2 cups of flour. Stir to combine. If you’re mixing the bread by hand, continue adding flour in small amounts until the mixture is difficult to combine by stirring.
-
Turn the dough out of the bowl onto a work surface generously dusted with flour and knead, adding flour, until the mixture forms a smooth soft dough. If using an electric mixer, add flour in small amounts, and scrape the dough off of the sides of the bowl often. When the dough begins to leave the sides of the bowl on its own, it should be ready– The consistency should be stiff, spongy, and slightly sticky. If you’ve never made bread before, I recommend kneading it by hand until you learn, by experience, what the consistency should feel like.
-
Turn the dough into a greased mixing bowl and cover with plastic. Let this rise in a warm place for 1 hour, or until doubled in bulk.
-
Grease your hands with a little oil, punch the dough down, and divide into 2 sections. Roll the dough into long loaves, folding the dough and pinching it underneath to make it smooth. Using a sharp knife (I like to use a serrated knife), score 3 slits in the dough about 1/4″ deep. Cover with a tea towel and let it rise for 35 minutes.
-
Preheat the oven to 375 degrees F. Beat 1 egg with 1 tsp. cold water, and brush on top of the loaves. You can sprinkle black pepper, poppy seeds, or sesame seeds on top of the glaze for decor at this point. Let the loaves rise, uncovered this time, 10 minutes more.
-
Bake for 25-30 minutes, or until golden brown and the loaves sound hollow when tapped. Cool on wire racks.
Recipe Notes
Tip: This recipe makes a soft crust. If you want a crusty loaf, brush the loaves with water before baking instead of the egg glaze.
The Perfect Amount of Flour: If you have a kitchen scale, this recipe is perfect with 920g of flour.
To keep this recipe easy to follow, you can check out these photos which correspond to various steps in the recipe. I hope they are helpful for you! Feel free to ask questions in the comments if you have any.
1&2:
3:

4:
5:
Note: You can test the dough by sticking your finger into it. If the indentation bounces back, it needs to rise some more– if it remains, it is done.
6:
7&8:
Used in this Recipe:
- Ingredients (see recipe card)
- Mixing bowl
- Measuring cups and spoons
- Glass measuring pitcher
- Large stirring spoon
- Sharp knife
- Pastry brush
- Baking trays
- Cooking spray or parchment paper
Like all homemade bread, this French bread is delicious served warm with butter. Mm-hm.
I’ll be back next week! In the meantime, however, I’d like to ask: What’s your favourite kind of bread?
–Naomi
This post contains affiliate links.
Light or marble rye!
Great recipe! Thanks for sharing it!
I can't wait to try making it!
Hmmm… I don't really have a favorite kind of bread, but I guess its brown or white. xD
I just made it, turned out great! It's HUGE! My favorite kind of bread is zuchini or multigrain 🙂
I really like multigrain French – I modified this and it wasy absolutely scrumptious!!!
I made this recipe…. I made one loaf plain and the other cinnamon/raisin
They were delicious
Thank you for sharing this recipe
❤️
I am making this now! I can't wait! Thanks for sharing!! I love French bread!
~ Allie K
Hi, I noticed your recipe calls for a 1/2 tsp sugar but in the instructions you say to add a 1/2 tsp of salt to the yeast… can you tell me which is correct?
Thanks!
Tricia
Hi, I live in New Mexico which is pretty high in altitude, and my yeast won’t wise to look like yours, it just looks like oatmeal water. It does have some bubbles but it didn’t get thick. I’ve tried it a few times now. Any suggestions?
Thank you!
Hey Kelsi! Are you letting your yeast rise in a cup, or in a bowl? I find that it does often look “Like oatmeal water,” especially if it’s in a wide dish (like a bowl, as opposed to a narrow one like a cup). If you let it sit for about 10 minutes and it starts to look like little clouds are “blooming” on the surface, your yeast should be active and good to use! 🙂
I just baked this French Bread! It’s so much easier and faster than regular loaves! I used honey instead of sugar and sesame on top! I always. MAKE 2 LOAVES, one for us and I give a loaf to our neighbor, Who doesn’t have a wife to bake bread! Thanks for the recipe! My neighbor always appreciates fresh warm bread! And my husband Who is spoiled gobbles it up! 😄
Oh wow, I'm glad you noticed that! That was a typo (which I will fix in a second); it should be 1/2 tsp. sugar with your yeast. The yeast could rise on its own, but the sugar “Feeds it” to help it rise faster.
All the best!
Can you refrigerate this dough after the first rise?
My favorite is Anadama. I make french bread but my recipe does not rise good. I wanted to try a different one. Thanks.
Yes, you can; I don't usually, but I have done that before and it works fine.
I haven't met a bread I didn't like! Two of my favs are marble rye and cheese.
Sour dough!!!!
I'm making this rightvnow! I haven't made homemade bread in a long time! In one of the loafs im puttin crasins, dried buleberrie, and chocolate chips! Can't wait to try it 😀
Thanks so much! I'm new to bread making & this recipe is a HIT! I've made it multiple times now & everyone loves it!
Oooh, I'll definitely have to give this recipe a try thierry marx video
Can you tell me why your bread is round shaped and mine is half moon shaped?
Not sure what you mean by “Half moon shaped,” but it might have to do with how well the edges are sealed underneath the loaves. I usually spend a minute tucking the dough under and shaping the loaves to look just how I want them– but sometimes, if I haven't done it tightly enough, the dough kind of lifts up and looks different when it's done rising.
Regardless, it shouldn't make a difference to the taste! Hope your bread is delicious, and thanks for your comment!
I’ve made the bread, for me, there is too much waterin the recipe, it is too sticky and constantly I needed to add more flour, next time I will reduce the water to about half of the amount you put in your recipe.
Hi Marko!
I’m sorry to hear that your dough was too sticky! Just a thought, sometimes that will happen when you have enough flour but the dough needs to be kneaded/mixed longer. If that is the case, my favourite trick is to put a bit of oil on your work surface, set the dough on top, and then put a bit of oil on the top of the dough. Then, turn a large mixing bowl upside down on top of it and let the dough rest for 5 minutes. Usually when you do this, when you go knead it some more, the stickiness is much less. All the best to you!
Could you clarify if this recipe calls for vegetable oil or olive oil? I used olive oil and I think it turned out well just wanted to check! Thank you
Actually you can pretty much use any kind of oil or fat for this recipe and it should work great! I’ve used vegetable oil, canola oil, olive oil, lard, butter, margarine… it all works!
Thank you, it was very well explained!
I tried to make this and failed miserably, my dough was way to sticky I had to use like three ties the amount of flour you specified ): idk what I did wrong but it just looks like a total mess. And to top it off, I'm pregnant, so my husband came to me crying over mangled dough lol
Aw, this makes me sad! Here's a tip for next time: Sometimes the dough is really sticky when it doesn't need more flour, so the best thing to do when that happens is to put a bit of oil on the surface you're kneading on, then set the dough on that, put another little bit of oil on top of the dough, and then turn a bowl upside down over top of the whole thing. Let this rest for 5 minutes, and then start kneading again– the dough should be nice and smooth after that.
Really sorry to hear that it didn't turn out for you! I hope you don't feel like you can't do it, though– sometimes it just takes a couple of tries. All the best! You can do it! 🙂
Really sad; I just deleted a very nice, anonymous comment on this post by accident. If you, the commenter, read this– Thank you for your comment. I would bring it back to life if I could, but… I don't know how. 🙁
I absolutely can not wait to try this for Easter dinner tomorrow! It's also my dad's birthday and he and I both had some teeth removal done a couple of days ago and this is DEFINITELY something him and I will both be able to eat, as long as I make it right! haha! Thank you!
The only bread I've ever made is Pillsbury from a can. I saw this recipe on Pinterest and would really like to give it a try. Thank you for the great tutorial. It's giving me the courage to attempt to make bread.
I've never made bread and I'm confused by this part: folding the dough and pinching it underneath to make it smooth. Help???
What this means is that, if you were kneading the dough, you would be folding the dough (kind of in half) toward you, kneading a couple of times, and then turning the dough and folding it again. This would keep the “folded side” of the dough smooth, and the rough side where it meets at your palms.
In this case, I have mixed the dough in a mixer, so to smooth it, I just folded it over (like I would for kneading) and then pinched the rough edge underneath so that the dough is smooth on top. The loaves are also made by shaping the dough so that the rough edge is underneath and then the top is smooth – That's a little different, since you want to shape them a certain way, but that's the general idea of what you're going for.
You'll get the hang of this as you practice – but no worries if it's rough when it rises; it shouldn't make a difference in the finished product. Even the bread can be baked looking a little rough; it's still the same stuff in the end!
Hope this helps – and all the best!
Thanks for the recipe! I just made these (my first ever attempt to bake bread)and they smell and taste so good!
How do you prep the pan? Do you use your floured surface to form them?
My preference is to use non-stick pans, lightly dusted with flour. If your pans tend to stick, you can either lightly flour the pan or grease it with regular cooking spray – Both should work just as well.
All the best!
I love your site and going to give this a whirl for dinner… so nice to have someone really show steps that helps when you are not certain on things… Your a blessing thank you again for the recipe. 🙂
I can't wait to try this recipe. I never made bread before. always buying fresh baked bread. I love onion rolls too. Thank you Naomi
Made this bread & it turned out fantastic! I've always wanted to bake bread but was so afraid to try. All I can say is never give up trying! This recipe is so easy to follow & is a great hit at the dinner table! My family loves when I bake this bread with our italian dishes! In fact they have asked me to bake this bread alone just because & we eat it with a delicious bread oil! Thanks for sharing! I have passed your recipe & blog on 🙂
This is a very good & easy french bread recipe.
I am making this now! Ive been trying a lot of different bread recipes im excited to see how it turns out!! I always freeze my bread atvthe point it would gobin the oven, other recipes have alway turned out great! That way I can do all my cooking on the weekend and have fresh bread during the week. 🙂
Great idea! I'd love to hear how it turns out. Thanks for the comment!
This recipe was delicious! I have been learning how to make bread on my own, through recipes, for about two years now. It takes alot of determination & courage to try new recipes for the first time! But I must say, this recipe is one of the best I have tried so far! Easy to understand instructions, photos are a plus, & simple ingredients! Delicious bread doesn't have to be complicated! Thank you for sharing. I will pass this on to others who want to try making bread 🙂
Ok so i made the bread according to recipe, after I formed the loaves and set them to rise again they got wider rather then taller resulting in bread that looked squished. Any idea what I did wrong?
The second time I let it rise it rose out instead of up. Any suggestions?
Hey Kelsey – Often when the bread is in a very warm room, or if there is a lot of sugar in the dough, it is more apt to rise a lot, and then it does kind of spread out as it rises (happens to me all the time). To avoid this, you can bake it a little sooner (when it looks done), or just be careful about the temperature of the environment or the sugar content in the dough.
All the best! I hope this helps.
hello i need help.at the recipe for french bread what is 1/2 c. lukewarm water;grams or ml;tyvm
Hey there!
You can check out http://www.convert-me.com/en/convert/cooking/ for a conversions chart – All the best!
–Naomi
i went to make french bread but became 3 breads so 2rrow i will make no 3 but 6 pieces.my cousin-aunt and my famiy love this bread,ty for the recipe
i made this recipe and was amazing my family and my relatives love this bread
I have this bread in the oven right now, and it looks and smells fabulous!
I am also a foodie blogger, and I love what I have read so far of your blog. 🙂 Yummy food! I love baking but am not the food photographer you are. 🙂 I have an itsy bitsy camera that is a little less than amazing. 😉
I would love to follow you/get to know you better. Do you have an instagram?
My blog is:
http://www.recipeshappen.com
Facebook:
http://www.facebook.com/recipeshappen
Instagram:
http://www.instagram.com/BonnieBerindean
I read your bio – I was homeschooled, too, and #5 of 6. 🙂 I am married now and we live in Toledo.
Bonnie
Just threw a batch together and it is rising in the bowl. Extremely easy to put together. Did it all by hand because I wanted to simplify the process as much as possible. Having the whole family over for a spaghetti dinner tonight and didn't want to run out to the store just for french bread! I've made many batches of bread……If this tastes as good as it looks and feels so far……. I'll never buy french bread again! Thanks for the recipe.
Sandy
This is really a great recipe. Everyone enjoyed including some fuzzy grandchildren. Making today for the second time – will make half into a sandwich loaf and the rest into crusty rolls for our steak dinner tonight.
This is really a great recipe. Everyone enjoyed including some fuzzy grandchildren. Making today for the second time – will make half into a sandwich loaf and the rest into crusty rolls for our steak dinner tonight.
So glad you're enjoying it! 🙂
This was the first time that I have ever made bread from scratch, so I was a little intimidated. However, this recipe was so easy to follow and the bread came out wonderful – everyone loved it!! Thanks for sharing. 🙂
I'm so happy I stumbled upon this recipe. Having never made homemade bread I found this recipe, and made it for a big family breakfast. I took it out the oven and placed it on the table and all my loafs were gone! Everyone LOVED it. I had comment that it was better them store brought breads, and because I took the time to made I think it made everyone that much appreciative. Thank you so much for the recipe. Easy to follow instructions made my bread a success!
So glad to hear it was enjoyed!!
My bread is rising (I hope) as I write. I have never had a lot of luck with bread. It always seems doughy. I did this one in a mixer as its the first time. I will learn manually once I have some reasonable success. I am wondering why it can be so nice and crunchy on the outside but still doughy inside? It sounded right……..not this one but the last bread I made. I am following you now so I can get some more recipes and hints. Thank you so much.
Awesome, glad to hear this Janice! I'd love to hear how your bread turns out– All the best!
I have made this bread about 4 times now and it doesn't rise much during the second rise. Do you have any tips?
Hi there!
Keeping the bread in a warm place will help it rise better. Sometimes if your environment is very cool, it will take longer to rise than otherwise.
All the best!
–Naomi
After frozen, how do you bake it?
iw lappa, “c.” stands for “cup”, so, 1/2 c. means 1/2 cup of water.
I cut the recipe in half and used my bread maker to prepare the dough. I also chose organic flour, olive oil and sugar and kosher salt. It turned out delicious! It's a keeper for sure. Have you tried with whole wheat flour? Thank you.
Hi Marcia!
YES, this is a basic bread recipe that can be adapted for pretty much any addition you want to make – If you use ALL whole wheat flour, the bread will be much heavier. If you use only about 1 cup per loaf of whole wheat flour and the rest white, however, the bread will still be a wheat bread taste with a fluffy texture.
I often also add oats, nuts, or other things like that to the dough – It comes out great. Glad you've had success with this recipe!
I have to tell you I've been making bread, rolls you name it for far too many to think about:). I love the fact that your recipe is so simple and versatile . I've saved it here on my iPad and plan to get up Mon morning and go for it:) ( don't cook on Sun) thanks so much for sharing, even us “older folks” like new simpler recipes. God Bless
I have made this bread a few times now and every time it is a hit. This time I added golden flax and sunflower seeds can't wait for it to rise again so I bake it and dig in.. this is a great recipe and an easy one that I share with beginners….my boys are always so happy to see these loaves.
I’ve made this a few times, and it’s always been delicious! I especially like to turn it into garlic toast 🙂 I do have a question, though … about how long should you mix/knead it in the stand mixer? I’ve never had any trouble when I do everything by hand, but when I try it with my KitchenAid, it seems the dough never smooths out/is very sticky and I end up finishing it by hand. I was thinking I’m not letting it go for long enough? Thanks for any thoughts you might have!
Hi Jen!
I’m so glad you’ve enjoyed this recipe! I know exactly what you mean about how it goes in the mixer – it does always seem stickier. 10 minutes mixing should be enough, so long as the dough is well combined. It will always feel stickier in there, you just have to get a feel for the thickness of it. I have made the mistake of adding too much flour to try to bring down the stickiness, but then the bread dries out faster.
So, my thoughts are – Keep doing what you’re doing, and rather than feeling the dough for smoothness, feel it for thickness. Once the texture seems right, you’re probably good to go – Just grease your hands to handle it so that it doesn’t stick too much.
Thanks for your comment!
–Naomi
Hi Naomi,
Thanks for the reply! I just did that with the too much flour this past weekend 🙁 … I kept adding “just a little bit more,” thinking it had to be almost done but that went on for too long. Thanks for the suggestion on the texture, I never really paid attention to that before, I was so focused on the stickiness!
Thanks 🙂
Jen
Could I use quick rising yeast?
I hadn’t made bread in ages and my bread pan got lost in the move, so this looked perfect. The first time I tried it was really wet and sticky, kept adding more flour and the bread turned out good.
Right now I’m trying it for the second time and it has turned out much better. I just completed the 35 minute rise and I’m ready to baste with the egg wash. They look great, this time I left the oven on all morning and let It rise on top of the stove.
Thanks for the recipe.
So happy to hear this, Tim! Thanks for your comment!
Could I use quick rising yeast?
Hey! I’m so sorry, your comment seemed to have slipped through the cracks! I’m sure you’ve figured this out long ago, but YES, of course you can! I usually do for mine.
All the best, and thanks for your comment!
Made this this weekend and they turned out great. Only thing I needed to do is add more salt next time and add garlic for better flavor. Otherwise super simple.
So glad you found this easy to follow! Thanks for the comment. 🙂
My bread didn’t hold its shape, it looks like a blob, what did I do wrong?
Hi Curbie!
It’s hard to say without looking at it! I’m guessing from your description that you either didn’t have enough flour for the bread to hold its shape, or that you didn’t knead it long enough! A good strong dough would take about 10 minutes to knead by hand. Also, if you substituted the flour for a low-gluten flour, that would also create a problem for the bread holding its shape.
I’m sorry this has been tricky for you! I hope this works out better for you next time!
I’ve made this bread 10 times and I’m making some now easy and excellent waiting for bread bag to come in so I can make some for my friends who are at home do to the stay at home coronavirus thank you for the recipe ❤️
Pat, I’m so happy to hear this!! Thank you for your comment! 🙂 Great that you can make bread for other people too- it’s a great skill to have, and to give- especially now!
I really want to give a go at this recipe after reading most of your commentary, but due to the stupid Corona virus, I only have access to cake flour? Will that be a problem, or should I just wait until I can get AP flour? Thank you for a French bread recipe! My favorite breads are:
French bread made in Nola, due to the water, is just fabulous!
Brown bread that you use to get from Steak & Ale, omg, that stuff was the bomb
Onion rolls, for a great burger, just add some great guacamole, and yum!!
Hi Lisa!
You know, I’m really not sure how this would turn out with cake flour! I would be concerned that it wouldn’t work properly, as cake flour has a lower protein (gluten) content than all purpose or bread flour, which means it wouldn’t likely hold its shape or achieve the same texture. You could always try a very small batch just to see, but I think it might be better wait until you can get some all purpose or bread flour. Or, if you like, you could try purchasing some gluten separately and adding a bit of it to your cake flour (you would probably need about 1/2 tsp added wheat gluten for every cup of cake flour to make it strong enough). I’ve never done that before so I can’t say for sure – but in theory it should work!!
Click on this link (it is an affiliate link – I hope that’s ok!) to getting wheat gluten if you are in the USA. If you’re in Canada I would check the Bulk Barn!
First attempt making bread. Mine did not rise during step 6. Not sure what I did wrong. Moving to next step and will see what happens. We’ll definitely try again another time if this fails but just wondering if you know what I may have done wrong.
Hey Linda! I’m sorry that you had trouble with the second rise! Did it rise properly for the first hour?
I do find that if it doesn’t rise enough the first time, sometimes the second rise will be much slower, in which case you would have had to leave it a bit longer. Also, depending on the temperature of your house, that can be a factor as well – I find that my bread needs a little extra time to rise on cold days, when the environment is cold.
If temperature is your issue, you can try putting a pot of boiling water in the bottom of your oven (while the oven is off), and putting the bread in the “cold” oven with that to rise. This creates a bit of a “Proofing chamber” for it to get warmth and moisture, both which help yeast to rise.
I hope these tips help! As a general rule of thumb, your bread should approximately double in size for each time it rises. If it hasn’t doubled, let it sit a bit longer until it is.
All the best! Thanks for your comment!
–Naomi
Hi Naomi-
Thank you so much for your quick response! Now it make a sense why my dough didn’t rise as much as it should have. It was a cold, rainy day in MA today and the house was definitely chilly. Nevertheless, the bread came out really good! I think denser then it should be but still good. The family finished one loaf (older teens & husband loved it!) and I have a loaf to make garlic bread tomorrow night. Looking forward to making it again with your tips!
Thank you again!
Take care,
Linda
You’re very welcome, and I’m glad you were still able to enjoy the bread! All the best next time, and thanks for your comment!
Can I freeze the dough for baking at another time? There are only 2 of us, so 2 loaves baked at once is too much and I have limited freezer space so it would take up way less space than after it was baked.
Hi Norell!
I have heard people say that you can, but every time I have tried that I’m not as happy with the results. I would recommend either making a 1/2 batch at a time, or, as I do for myself and my husband, I would bake 2 and then freeze one of the baked loaves in a plastic bag. It freezes really well!
If you want the loaf to come out “Like fresh,” just heat the oven to 375 degrees F and throw your frozen loaf in there on a pan for about 10-15 minutes.
Hope this helps!
Why is my bread so heavy. Should it be? I’ve made this recipe in a stand mixer probably 75 times so far and it feels so heavy. Do I mix it on high in the mixer or low? (Kitchen Aid) I use the dough hook for the whole process.
Please help, it always tastes delicious just heavy.
Hey! You could probably get away with adding less flour! Just try adding less and handle your dough with a little bit of oil in your hands to keep it from sticking to your hands. Also, I would say mix the dough on low speed in a stand mixer (maybe a 2 for speed), and going longer (say about 8-10min) will strengthen the dough without adding extra flour.
This recipe is THE BEST. I’ve made it many many times. I’m wondering – could I make smaller loaves – little baguettes maybe – and use for French Dip sandwiches? I wonder if the cook time/temp would have to change?
Hi Kristen! YES, you sure can! I’ve done it before into smaller, long loaves for sub sandwiches and I love it that way. It obviously doesn’t come out as crusty as a traditional baguette, but yes; you can certainly bake it that way. I would say for smaller loaves, bake them at 400 degrees F check them after about 20 minutes. If they are brown and sound hollow when tapped — they are done!
Tip: remember that they always rise to be much bigger than when you first shape them, so make sure they aren’t too big!
Hi, wow! I made this bread and it is absolutely amazing I can’t wait to sink my teeth into it.
Thank you very much!
Delicious!
Thank you!
Been making this for years now….just tried it in my Dutch oven to make boule rather than a loaf. Came out great!
Thanks Laura for the comment – now I want to try this!! What a great idea. 🙂