
Gum Paste Roses – The Full Rose, Part 4/5 [Tutorial]
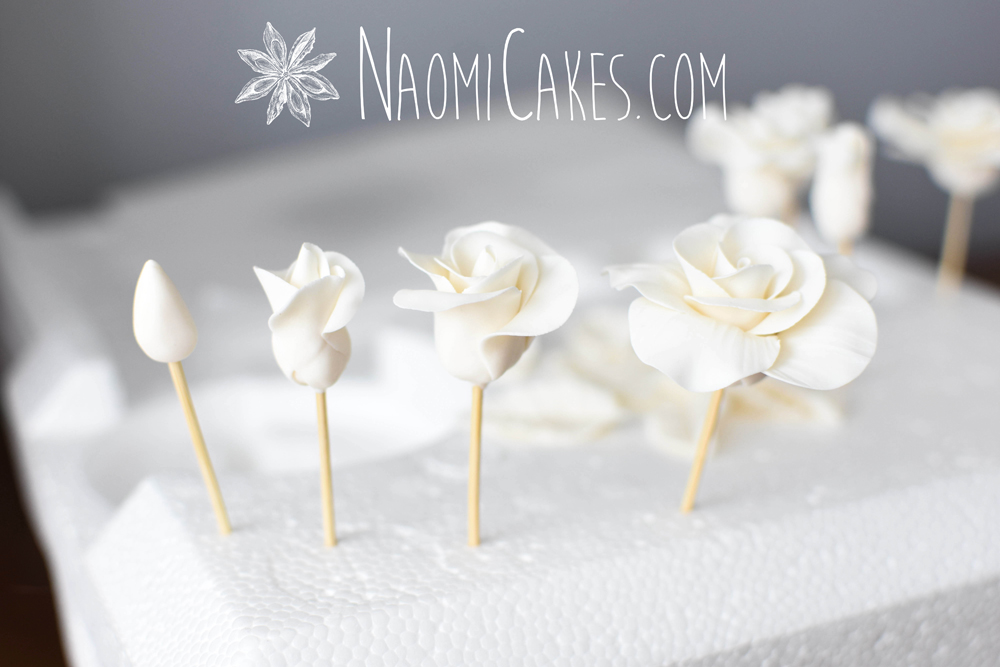
Ok everybody, we’ve made it to the last step of making our gum paste edible roses! If you’ve been following me for the past little while, you would have first learned to make the rose base, then the rose bud, and then the medium rose (half bloom roses). Today, we’re moving on to the next step: the full rose.
Gumpaste flowers are one of the most stunning ways to make any kind of cake beautiful. I especially love making elegant flower displays for wedding cakes, and a gorgeous rose is one of the most romantic and beautiful gum paste flowers to make.
Whether you’re making a birthday cake, a wedding cake, an anniversary cake, or a shower cake (or anything else for that matter) – learning to make edible flowers is one of the best ways to make a stunning impression with your sugar crafting skills!
What is gum paste?
Gum paste is a type of stiff, pliable icing that can be rolled, cut and shaped into beautiful edible decorations. It also dries completely hard, making it perfect for making beautiful handmade gum paste roses, leaves, blossom shapes, and many other perfect gum paste sugar flowers.
How to make colored edible roses
For this part, I’m going to say: stay tuned! My next tutorial will teach you how to tint your roses with petal dusts, making a white sugar rose into a gorgeous red color.
This is a method that can be used for any color you want your flowers to be, in various shades, with the option to make your flowers take on an even more realistic look as well.
Tips for working with gum paste
Gum paste is not hard to work with, but it can be time consuming, and it can also be frustrating if you’v never dealt with it before. Here are a few tips to making this process a little more simple for you.
Keep gum paste covered until it’s ready to dry
Since gum paste begins to dry as soon as it’s in contact with the air, it is important that any un-used pieces of gum paste are kept tightly covered until you are ready to use them. For example, if you’re cutting out leaves with rose leaf cutters, you’ll want to make sure that any pieces that you aren’t ready to work with yet are covered tightly with plastic wrap to prevent the air from drying them out.
Use shortening, cornstarch or icing sugar to prevent sticking
Gum paste is quite sticky, and it’s best to make sure the surfaces you’re working on are lightly greased or dusted with cornstarch (or icing sugar) to prevent the paste from sticking to your foam mat or table.
Choose the best tools
When you’re purchasing a set of gum paste tools, I would recommend looking for a set with smooth handles. It’s something I never would have thought of apart from experience, but trust me: when you’re holding a tool and rolling it with your hands repeatedly for many, many small pieces of gum paste– a textured handle can really hurt your hands!
Note: This is sometimes easier said than done! Many gum paste tools have textured handles or alternate shapes on the other end, which can make them uncomfortable to hold. You can just keep this in mind when you’re shopping!
Practice
Like anything, working with gum paste takes practice. You can make beautiful gum paste decor the first time you ever try, true: but remember, it only gets better from here!
Some more inspiration
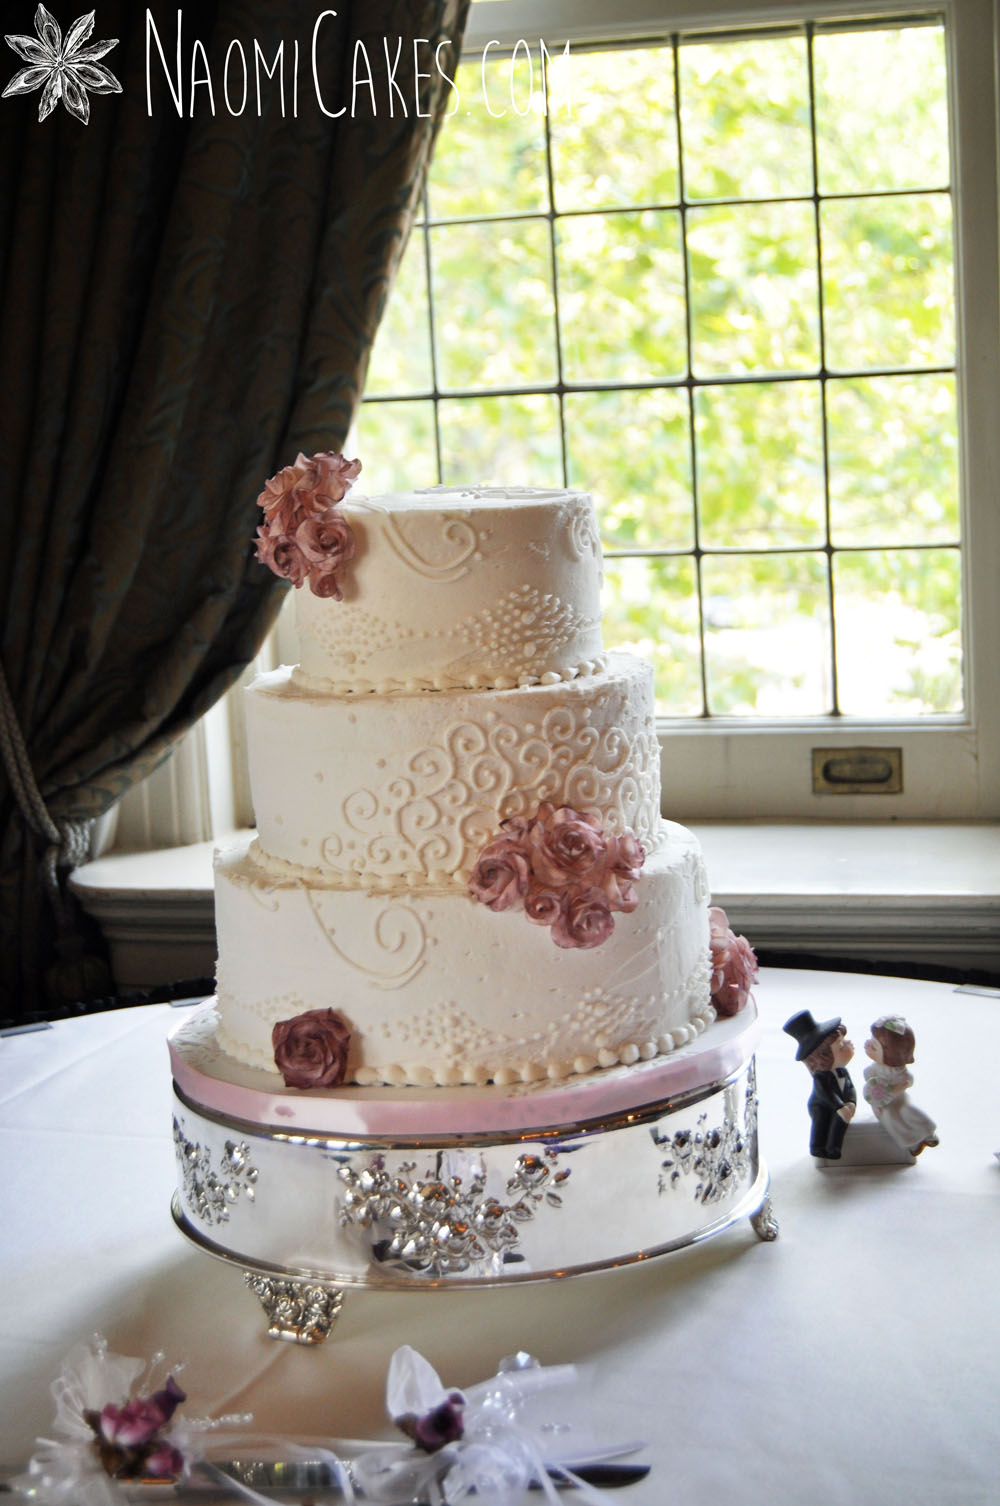
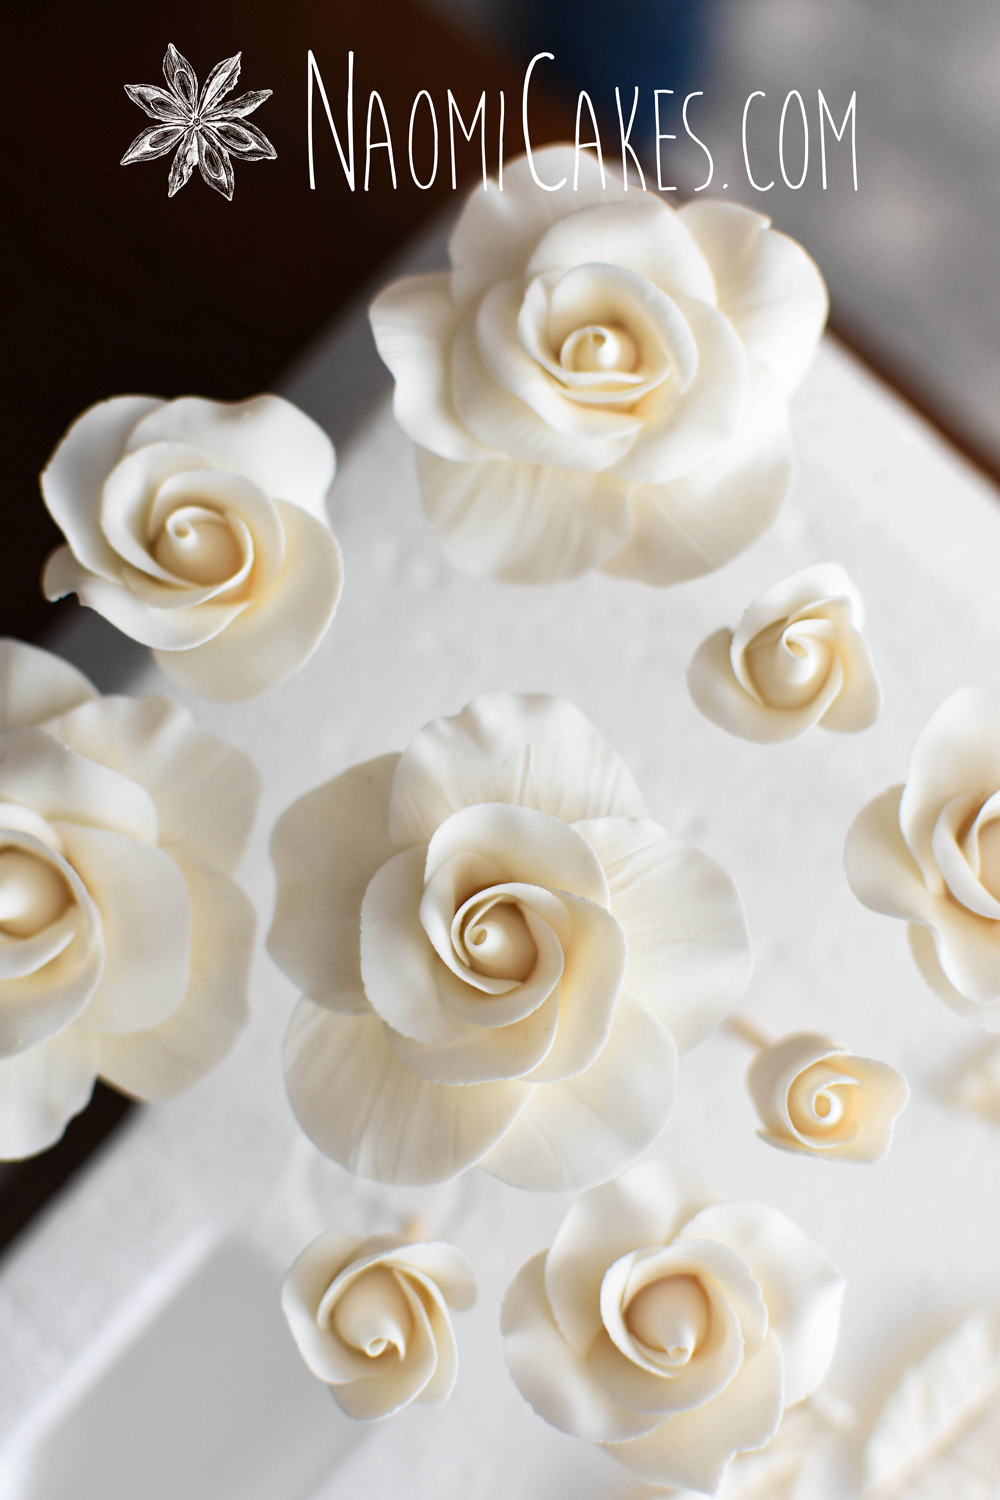
In previous posts on this topic, I’ve shared some pictures of cakes I’ve made using the gumpaste roses from this tutorial (usually using beautiful large classic white roses, as well as a few medium roses and small roses or rose buds).
Today, I’ll share another cake with edible roses, but this time with some added color (pink roses with violet petal dust). This cake was made using the type of roses I’ve created for this tutorial: roses built on toothpicks.
In the future, I may come back to teach you all how to create rose stems with floral wire, but for now I’ve opted to stick to this simple, beginner method of building the roses on toothpicks.
Let’s get started!
You will need:
- Styrofoam block
- Pre-made medium sized roses (see my previous tutorial)
- Gum Paste
- Vegetable shortening
- Plastic Wrap
- Glass of water
- Cornstarch (in a tea ball or cheesecloth bundle, for easy application)
- Rolling Pin
- Foam Mat
- Ball/Frill Tools
- Paint Brushes
- Cell stick (optional) – Some gum paste tool kits will include one of these
- Silicone veiner* (optional)
- Rose Cutter Set


Large Gum Paste Roses (Edible Roses)
This is part 4/5 on making gum paste roses @naomicakes.com!
Ingredients
- pre-made medium sized gum paste roses enough for the number of large roses you want to make (see my previous tutorial)
- 1 golf ball sized piece gum paste see recipe notes
- 1-2 tsp vegetable shortening
- plastic wrap
- 1 glass water
- 1 small fondant/gum paste rolling pin see recipe notes
- 3 rose cutters set
- 1 foam mat
- corn starch in a tea ball or cheesecloth bundle in a tea ball or cheesecloth bundle, for easy application
- 1 ball tool/frill tool
- 1 new/clean* paint brush *must be new or only used for this process to be food safe
- 1 cell stick optional
- 1 veining tool optional
- 1 piece styrofoam
Instructions
-
Lightly grease a clean work surface with some vegetable shortening, put a little on your hands, and knead the gum paste until smooth and pliable.
-
Roll the gum paste out until it is quite thin; about 1/8″ or a little thinner.
-
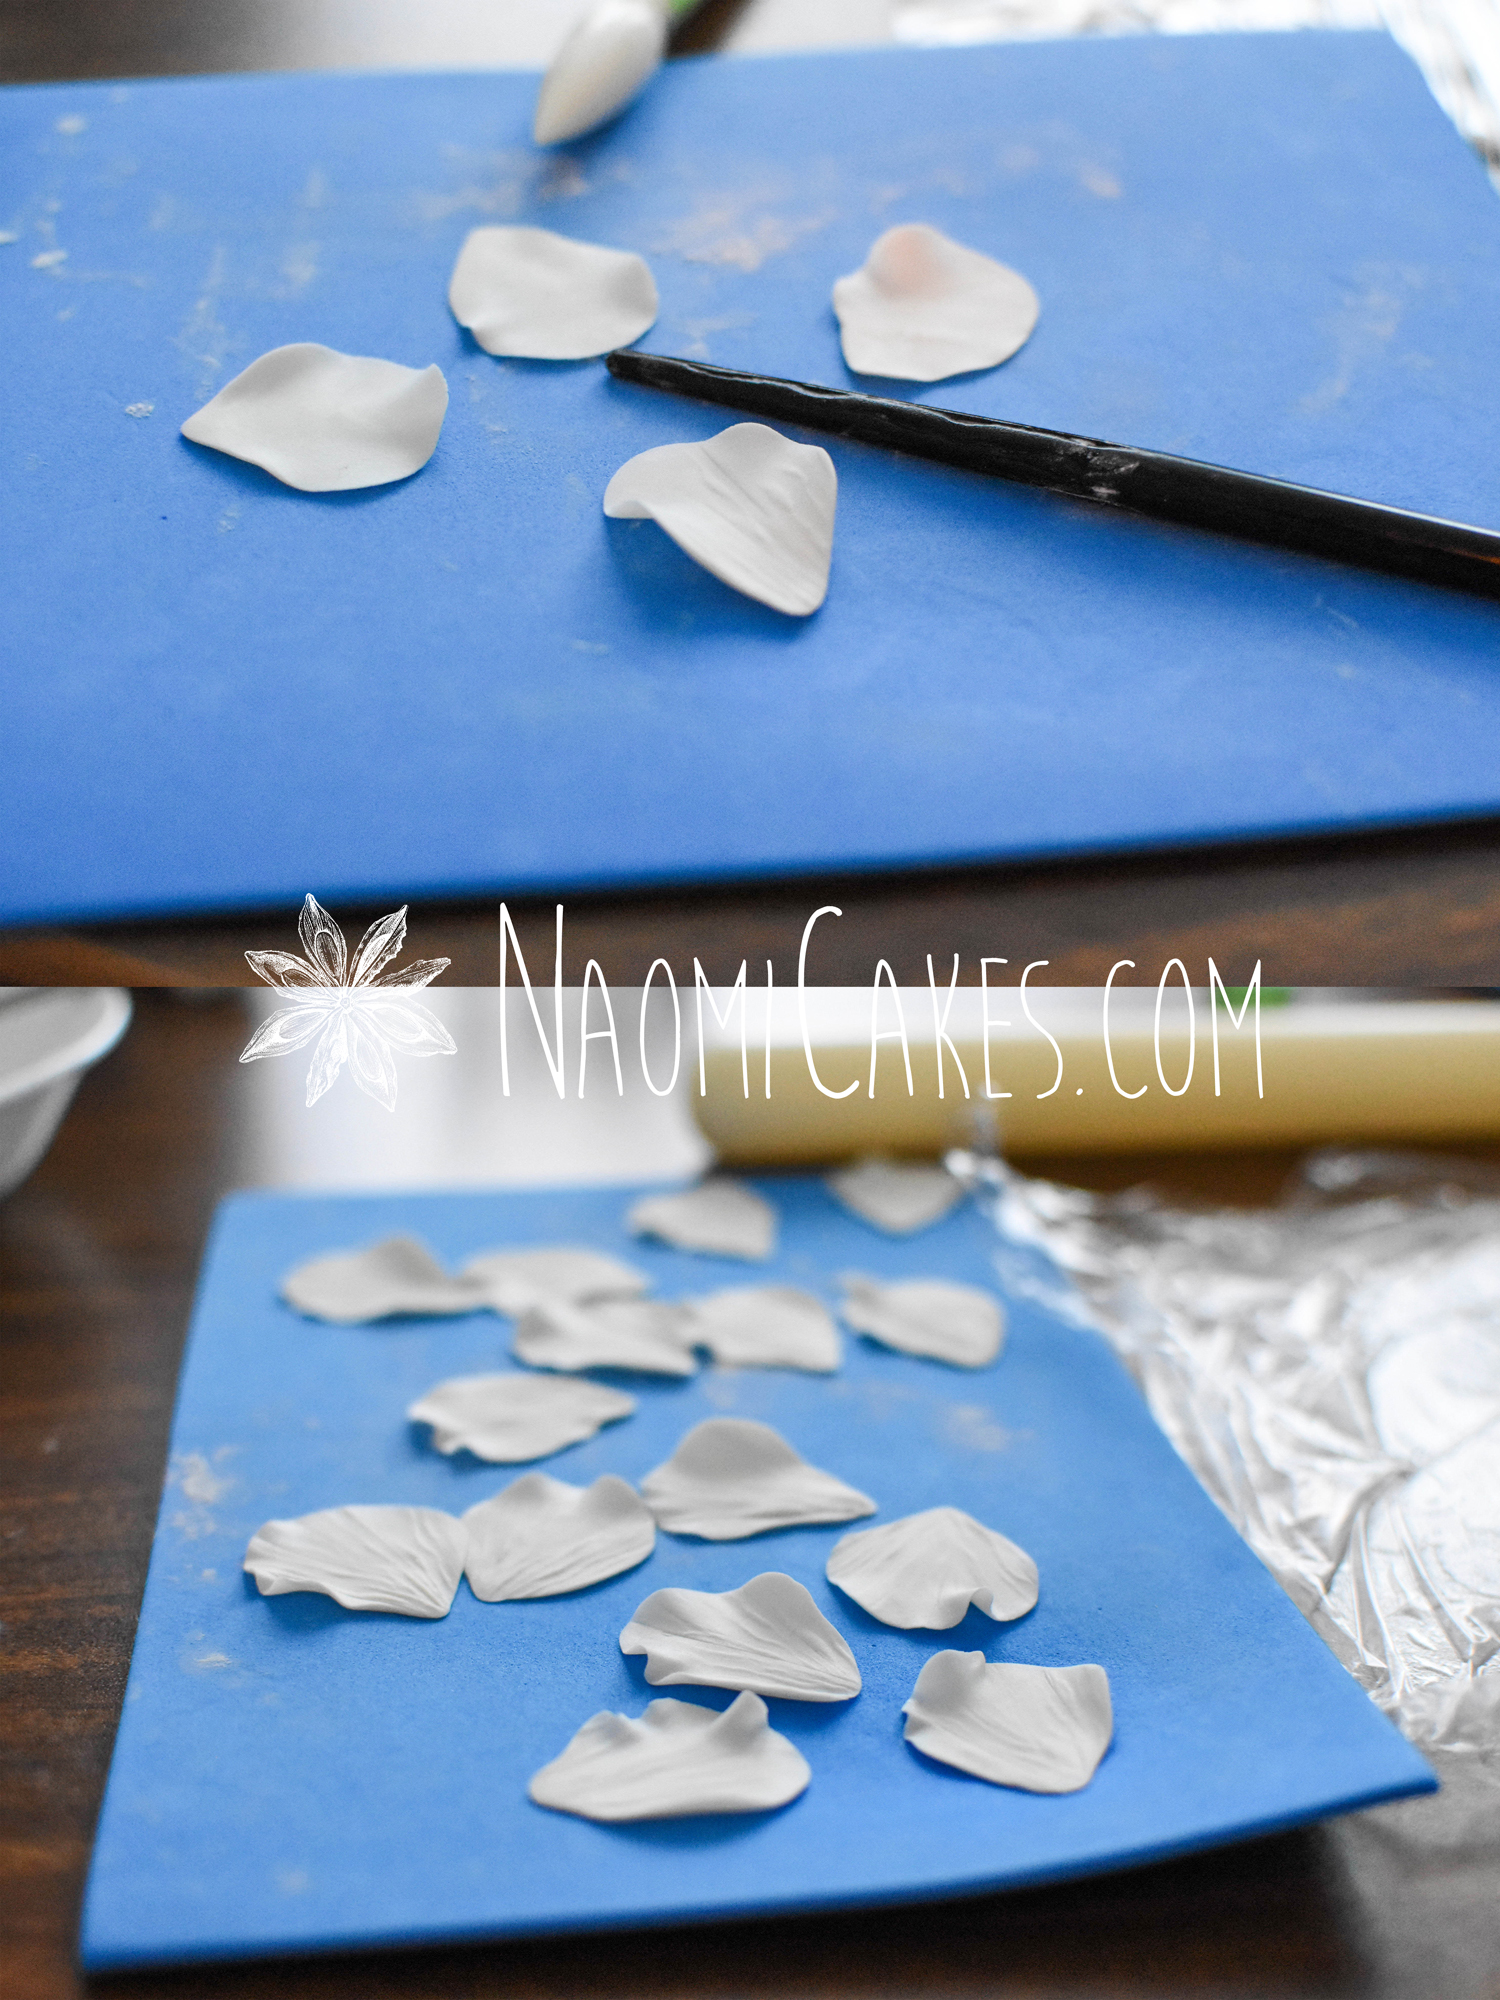
Using the large sized rose petal cutter from your set, cut out 5-8 petal shapes per rose base (example, for 4 roses you would need 20-32 petals; I used 5 per rose for this tutorial). Remove the excess gum paste from around the cut-outs, shape into a ball, and wrap in plastic. Set aside. Cover the cut rose petal shapes on the table with plastic until ready to use.
-
Lightly dust your foam mat with cornstarch to prevent the petals from sticking (I like putting it into a little homemade cheesecloth bag-like a cloth sieve- to make this most simple). Remove 1-5 petals from under the plastic at a time, and gently thin/frill the edges of each petal with the frill or ball tool (also dusted with cornstarch).
-
From the centre outward, roll the veining tool (or press the petals in a silicone veining tool) across the petals to make the impression of vertical veins on each one.
-
Allow the petals to rest for 20 minutes, just to take on a little bit of structure, before proceeding to the next step. For best results, let the petals rest for 20 minutes, vein side up, on cornstarch dusted spoons. Make sure the thin, wide edge of each petal slightly sticks up off the edge of the spoon, so that the petal takes on that "curled" look. DO NOT LET THE PETALS REST LONGER THAN THIS.
-
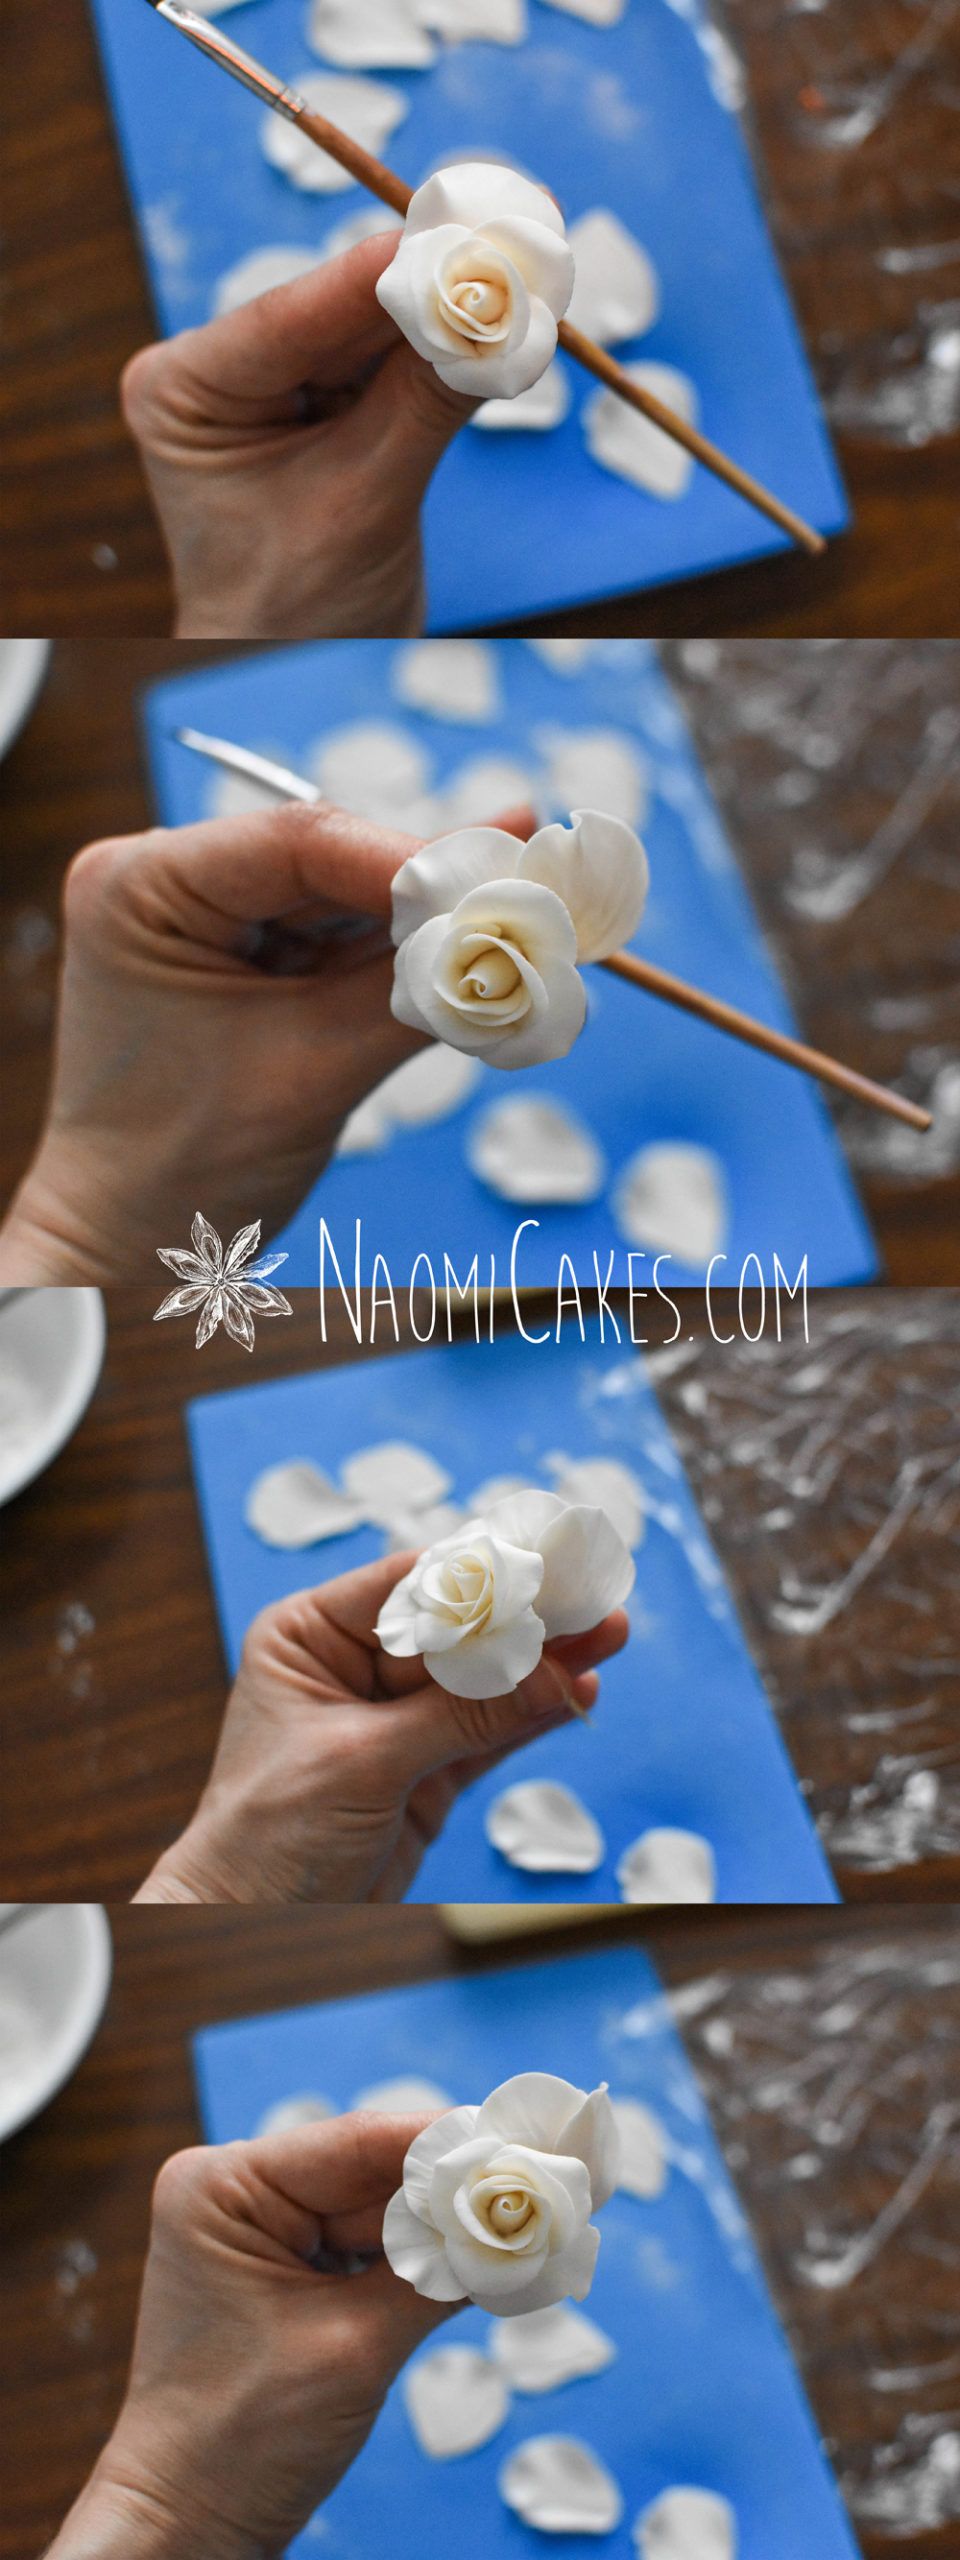
Dampen the base of one petal with water on the veined side, and wrap it (vein side up) around your pre-made medium rose, with the edge of the previous petal in the middle of the new one.
-
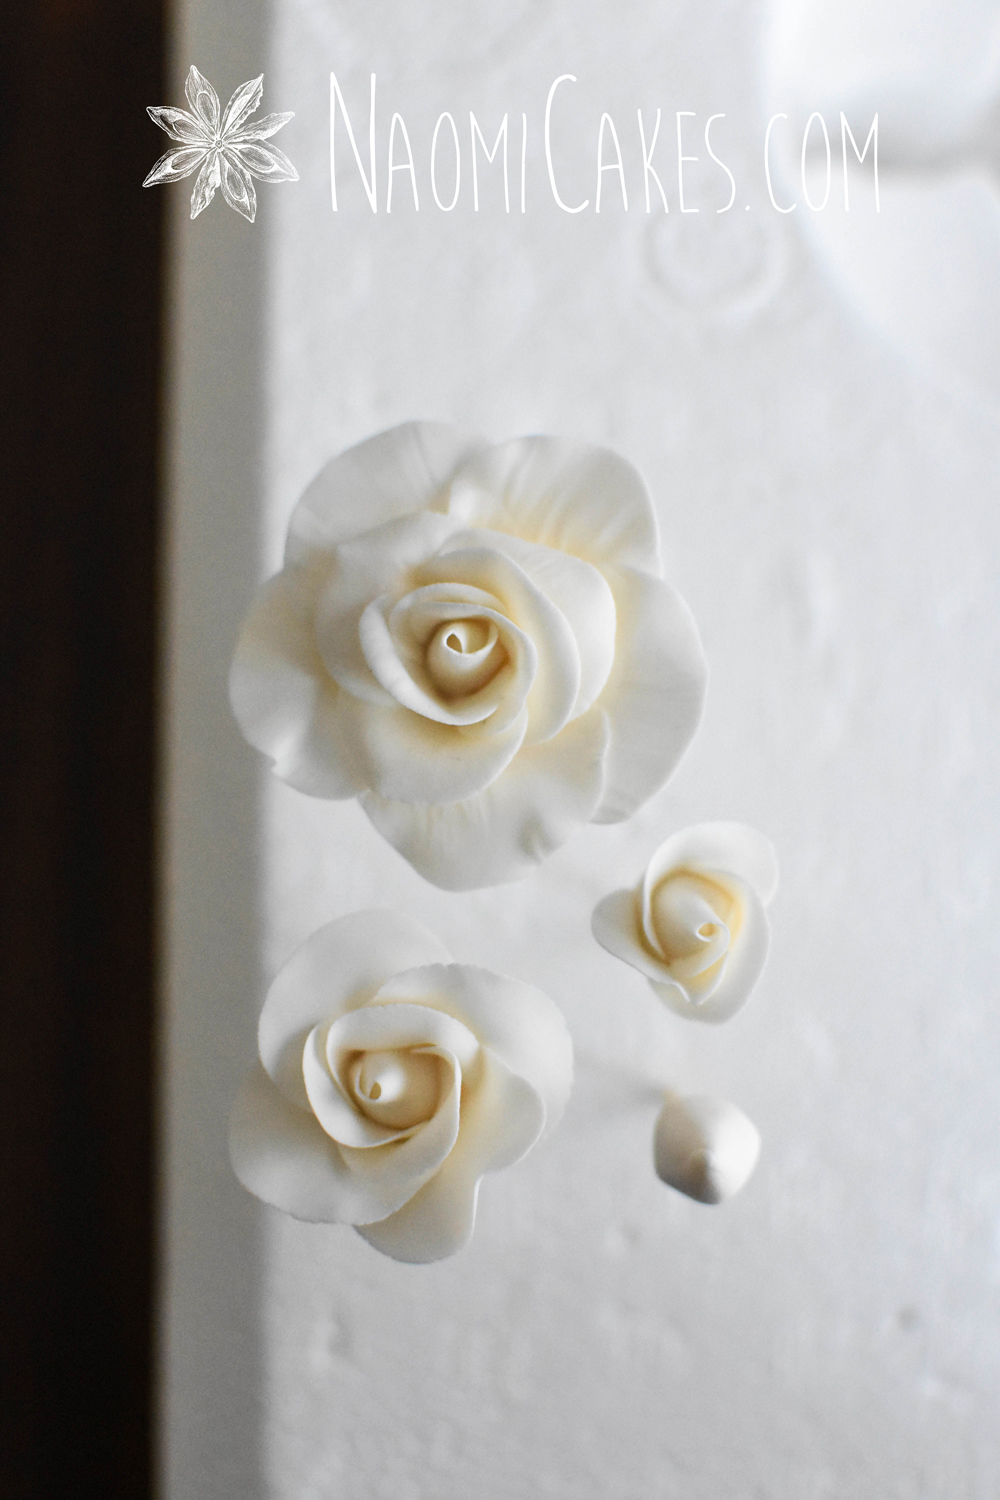
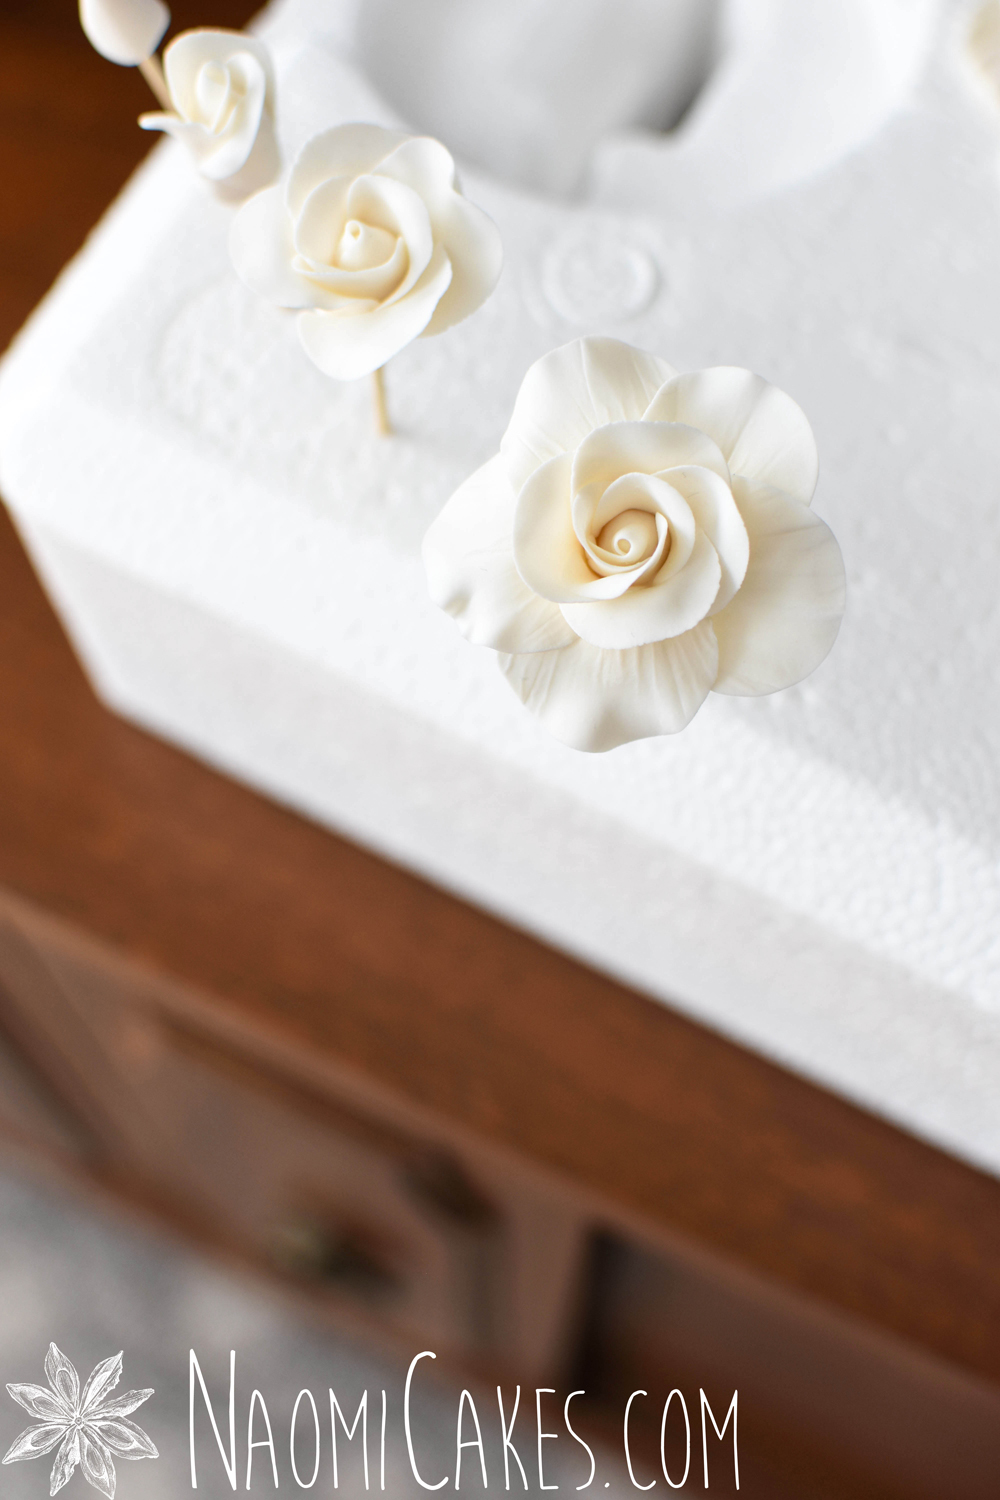
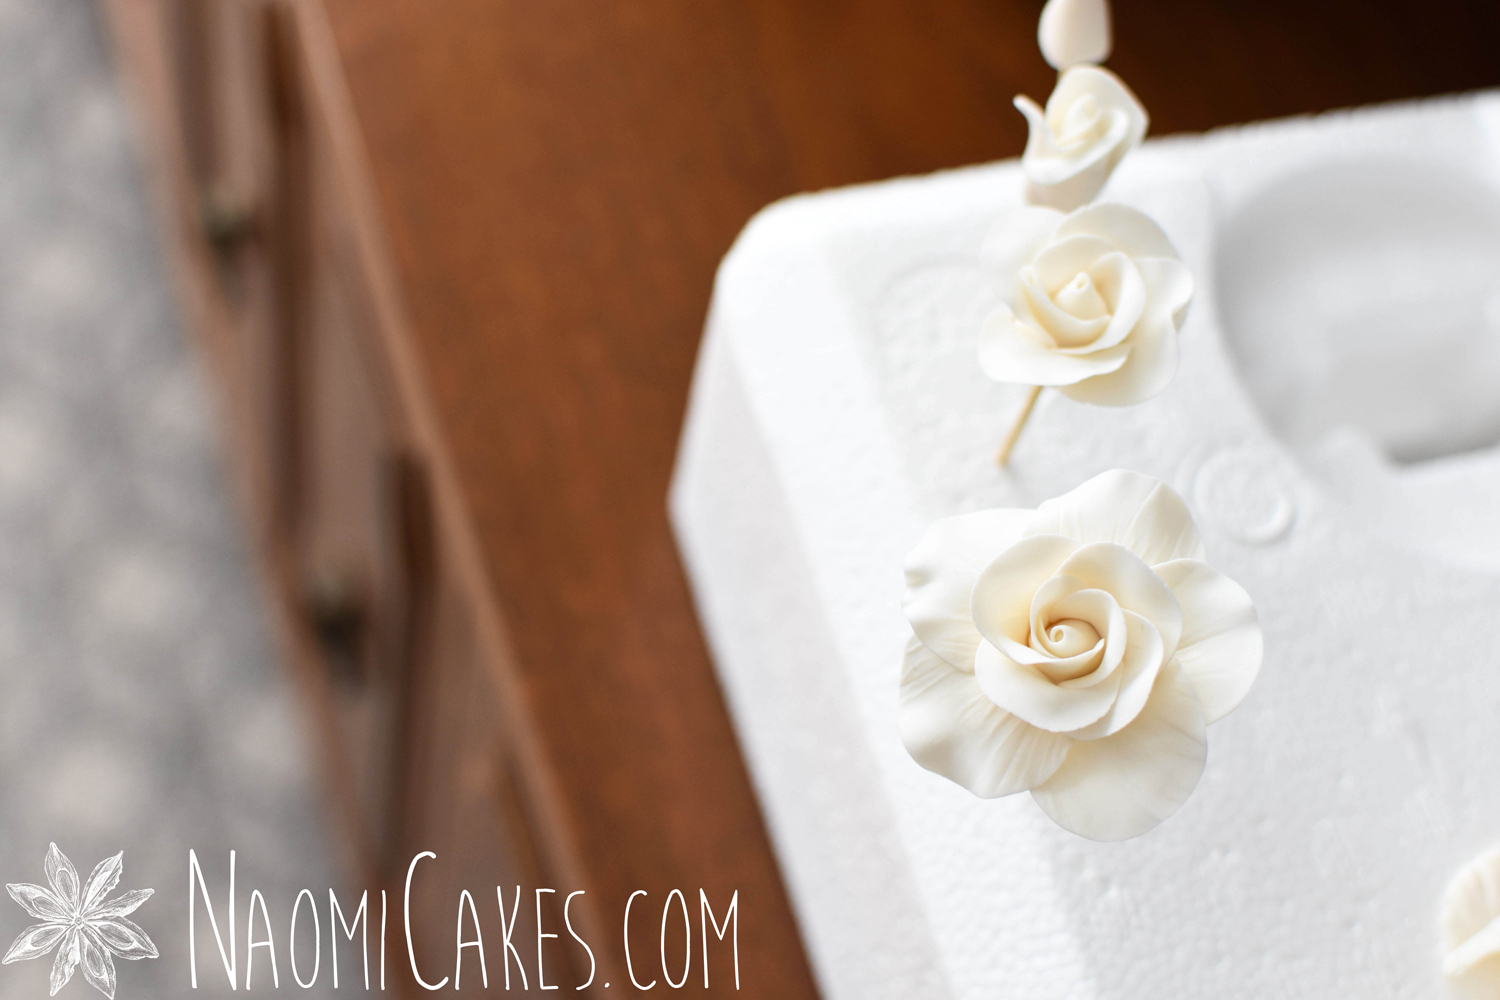
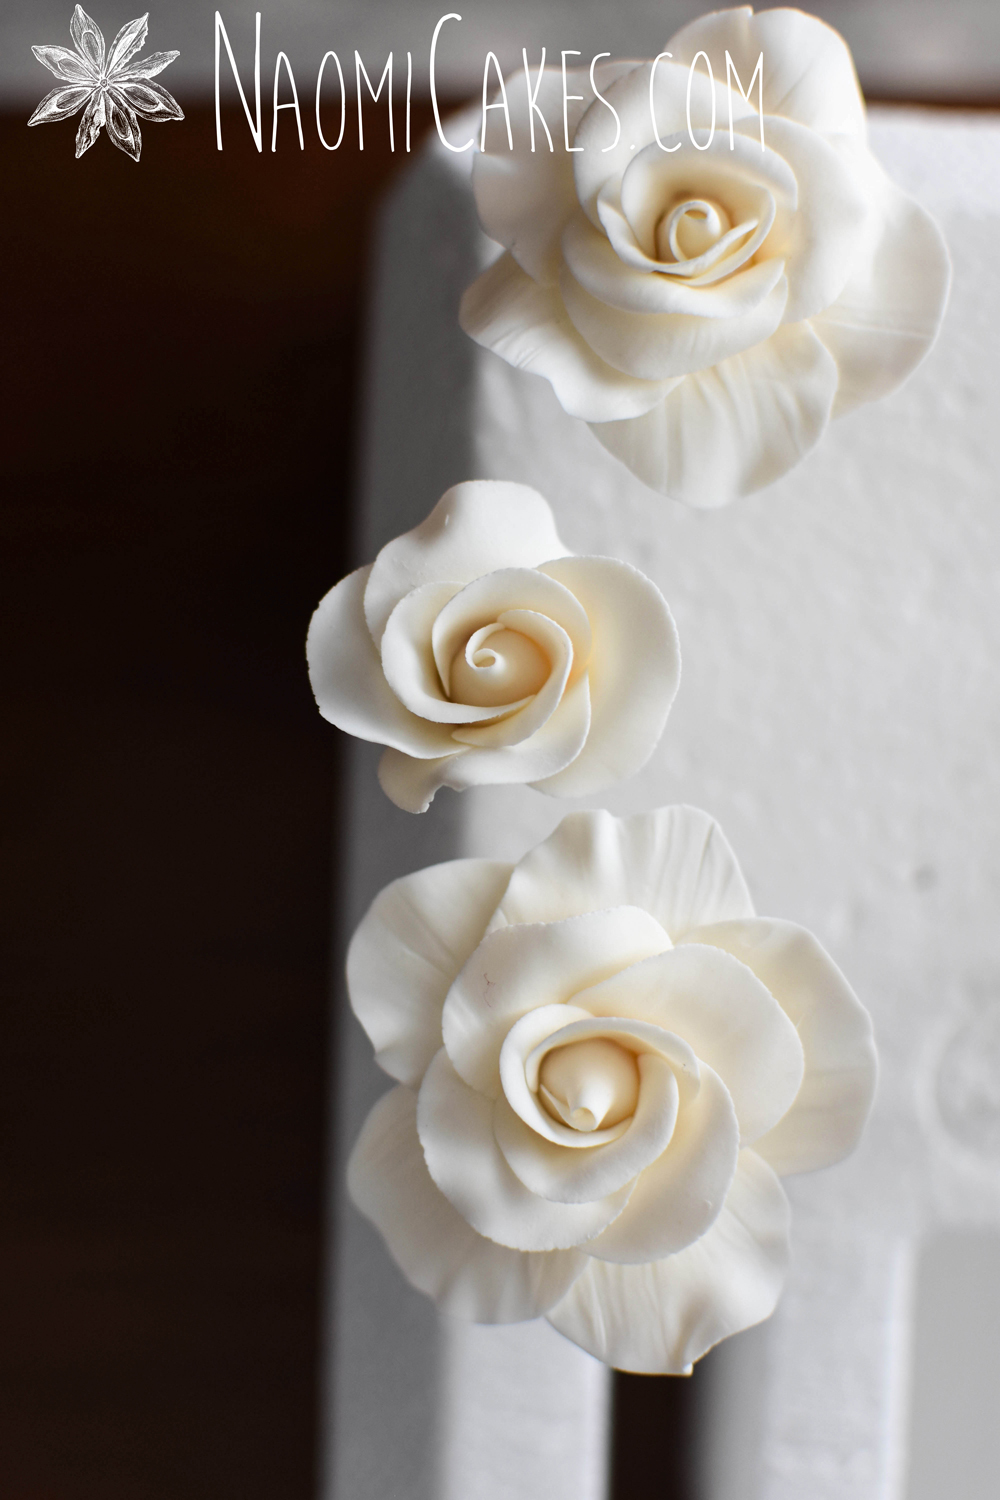
Moisten the tip of another petal on the veined side again, and tuck the edge of it underneath the first petal (again, vein side in), securing it to the rose at the moistened base. Repeat with the remaining petals, arranging them with your fingertips to look nice and full. Frill the edges out with a cell stick or your fingertips. (See photos in this tutorial for reference.)
-
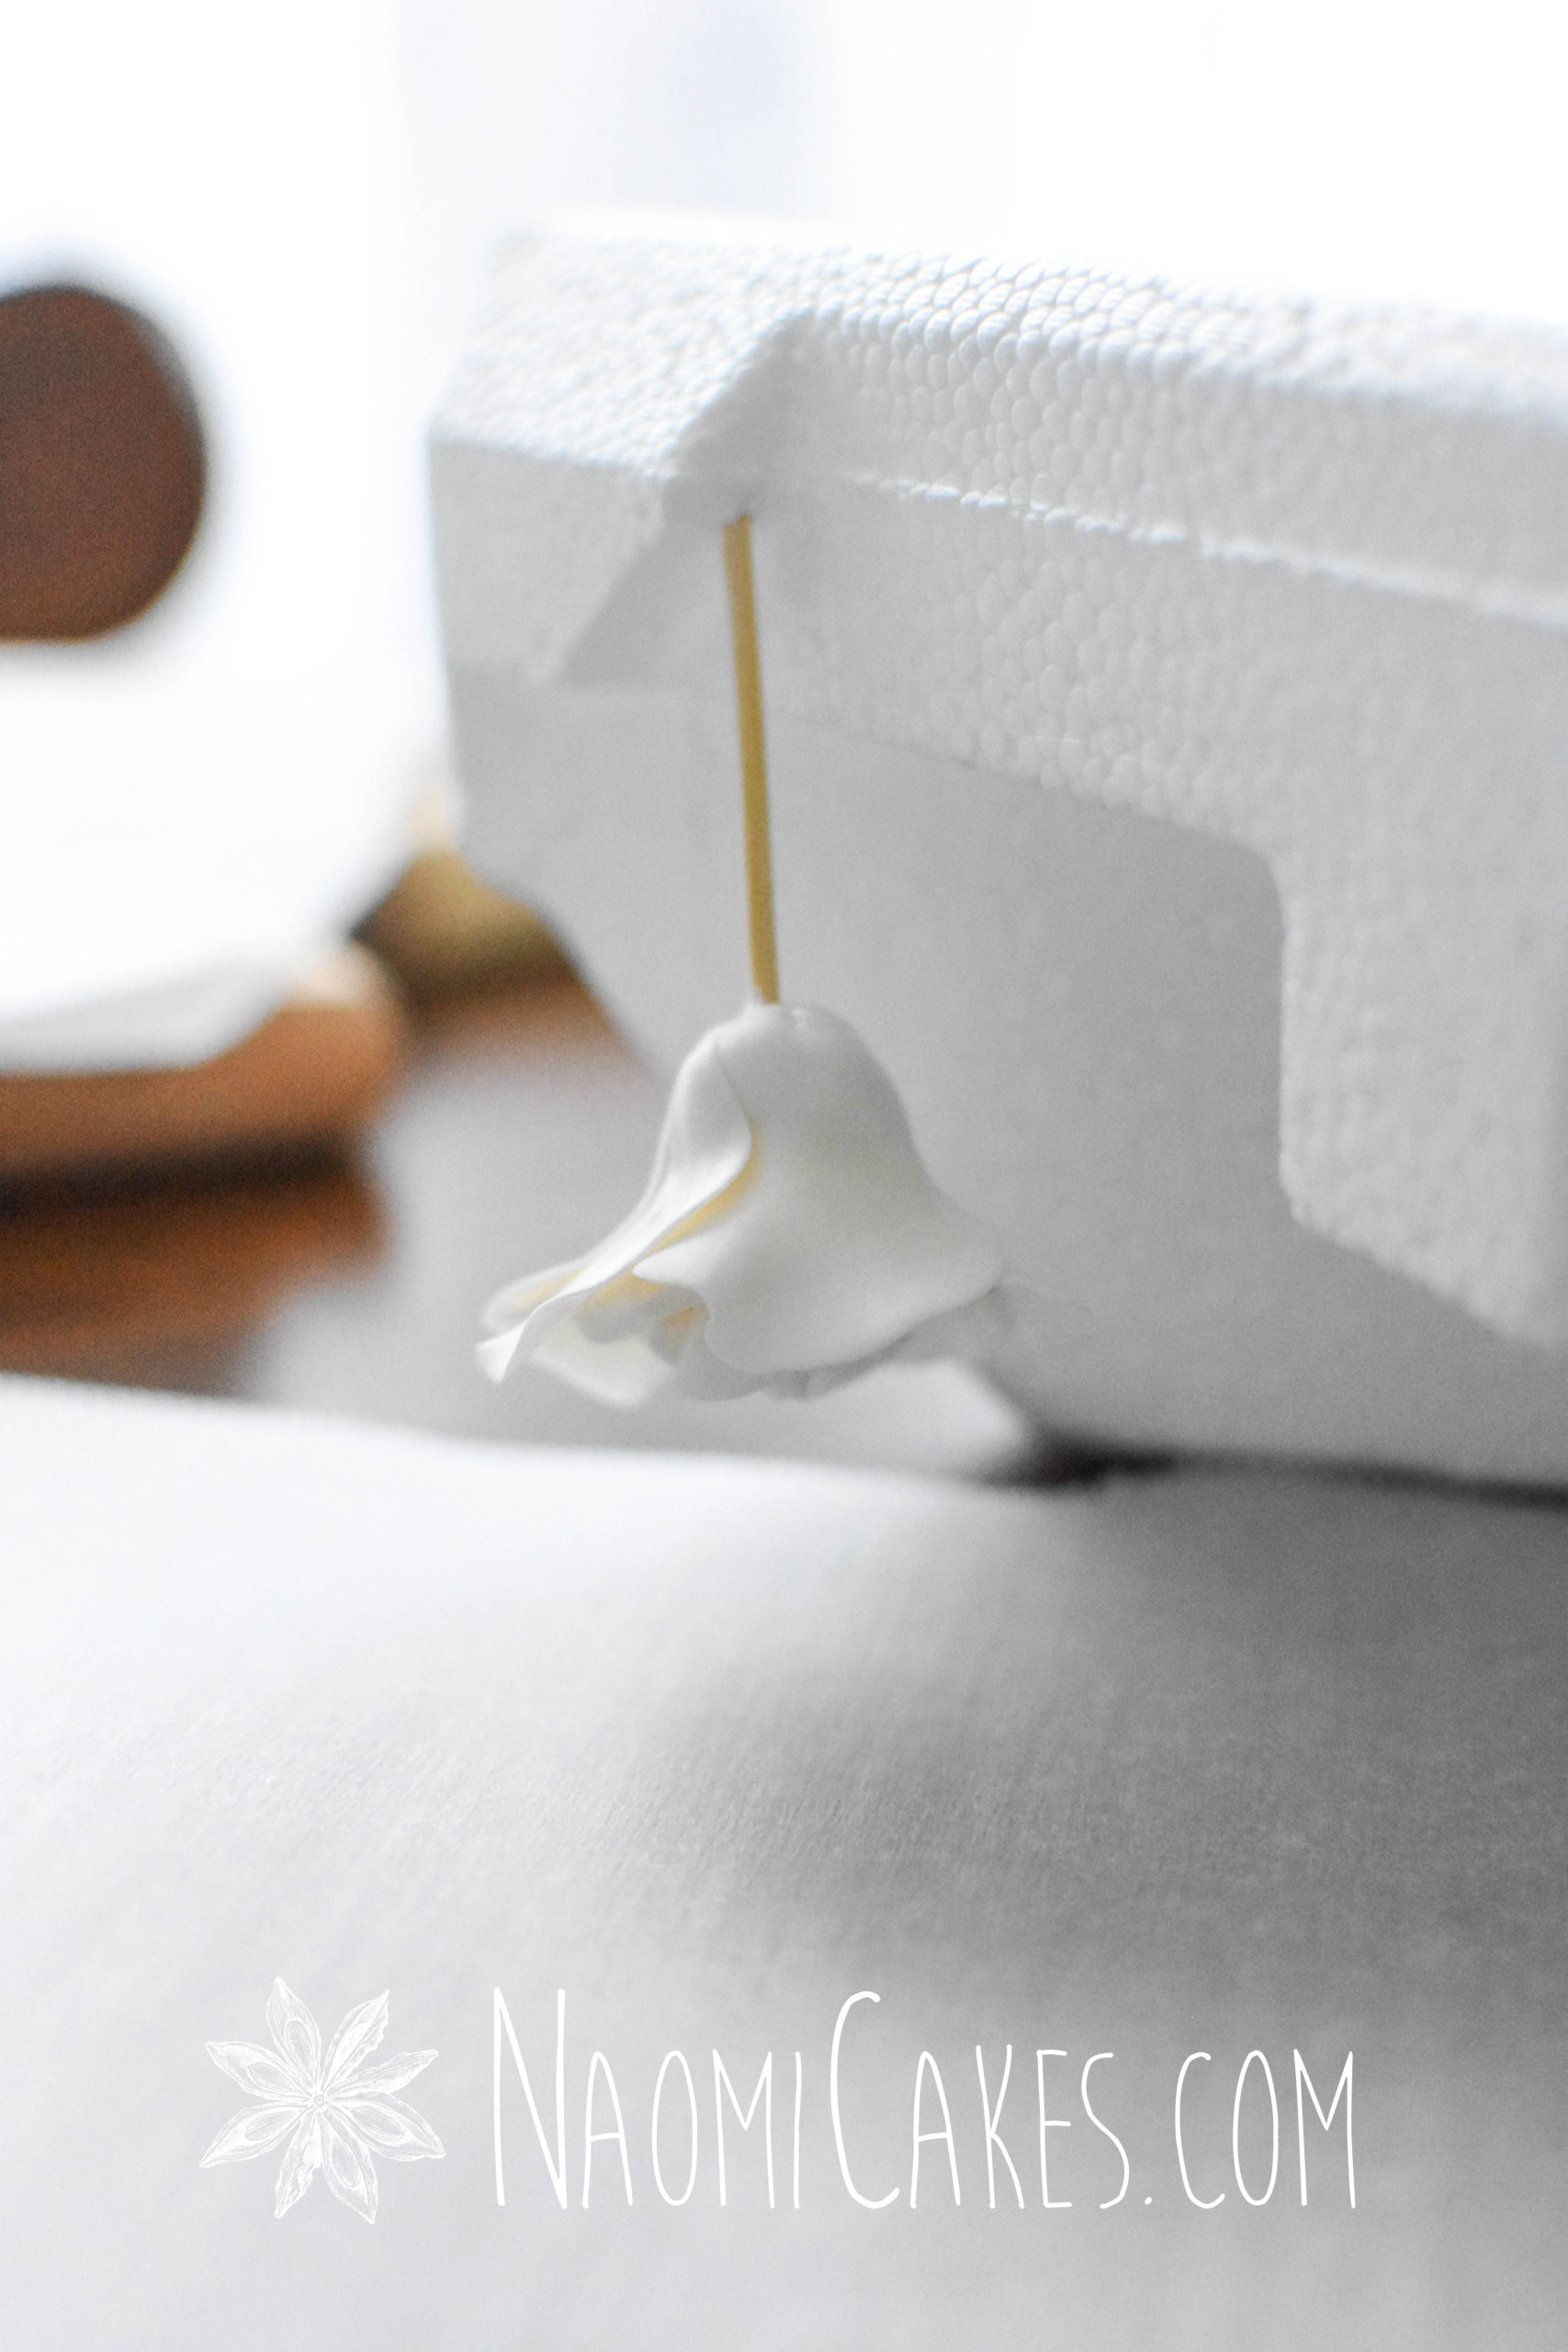
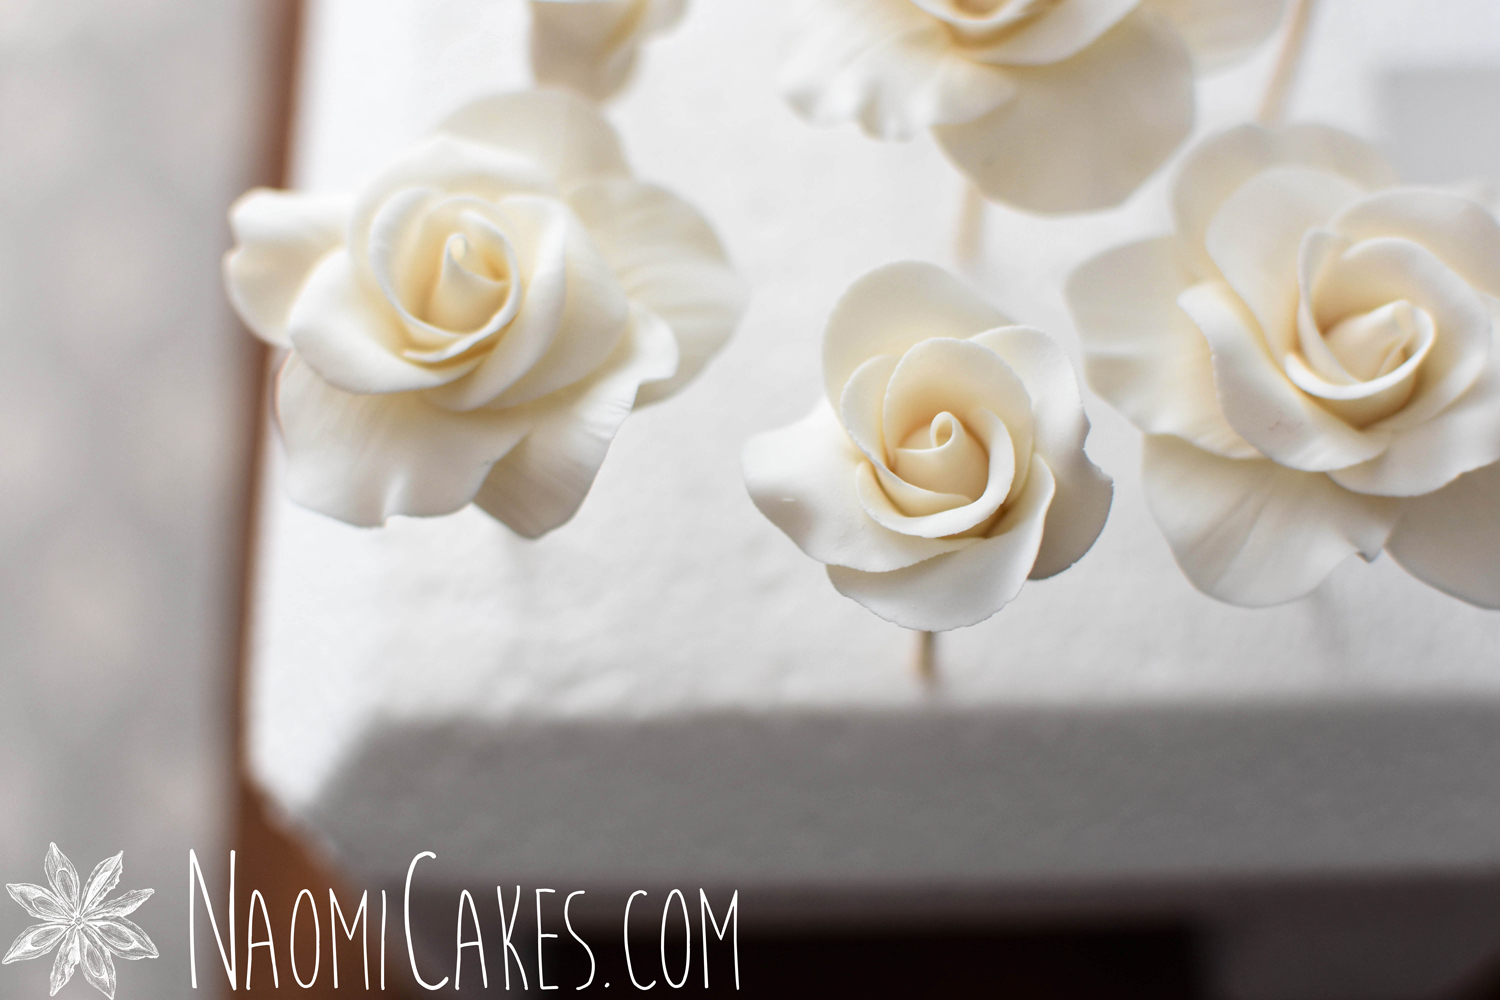
At this point, the roses will want to "open up." So, to keep their shape, stick the toothpick end into styrofoam upside down (see photos for reference) to begin to set. Allow the rose to dry completely for about 20-30 minutes, and then turn it over to sit upright and complete drying for at least 12-24 hours.
-
The thoroughly dry roses will keep in a cool, dry place for several months in a closed container. Humidity will cause the roses to "wilt" and you may not be able to keep them if that happens.
Recipe Notes
IMPORTANT: Any leftover gum paste will dry out if it’s not kept well-sealed. I recommend wrapping it in plastic, putting it into a ziplock bag, and putting it into a sealed container to keep maximum freshness.
How to make full (large) gum paste roses
Here we go, step-by-step! This is how to make larger roses (full roses) from gum paste, after following my previous three tutorials for the rose base, the rose bud, and the medium rose. Make sure to check out the previous posts on this topic for more step-by-step photos!
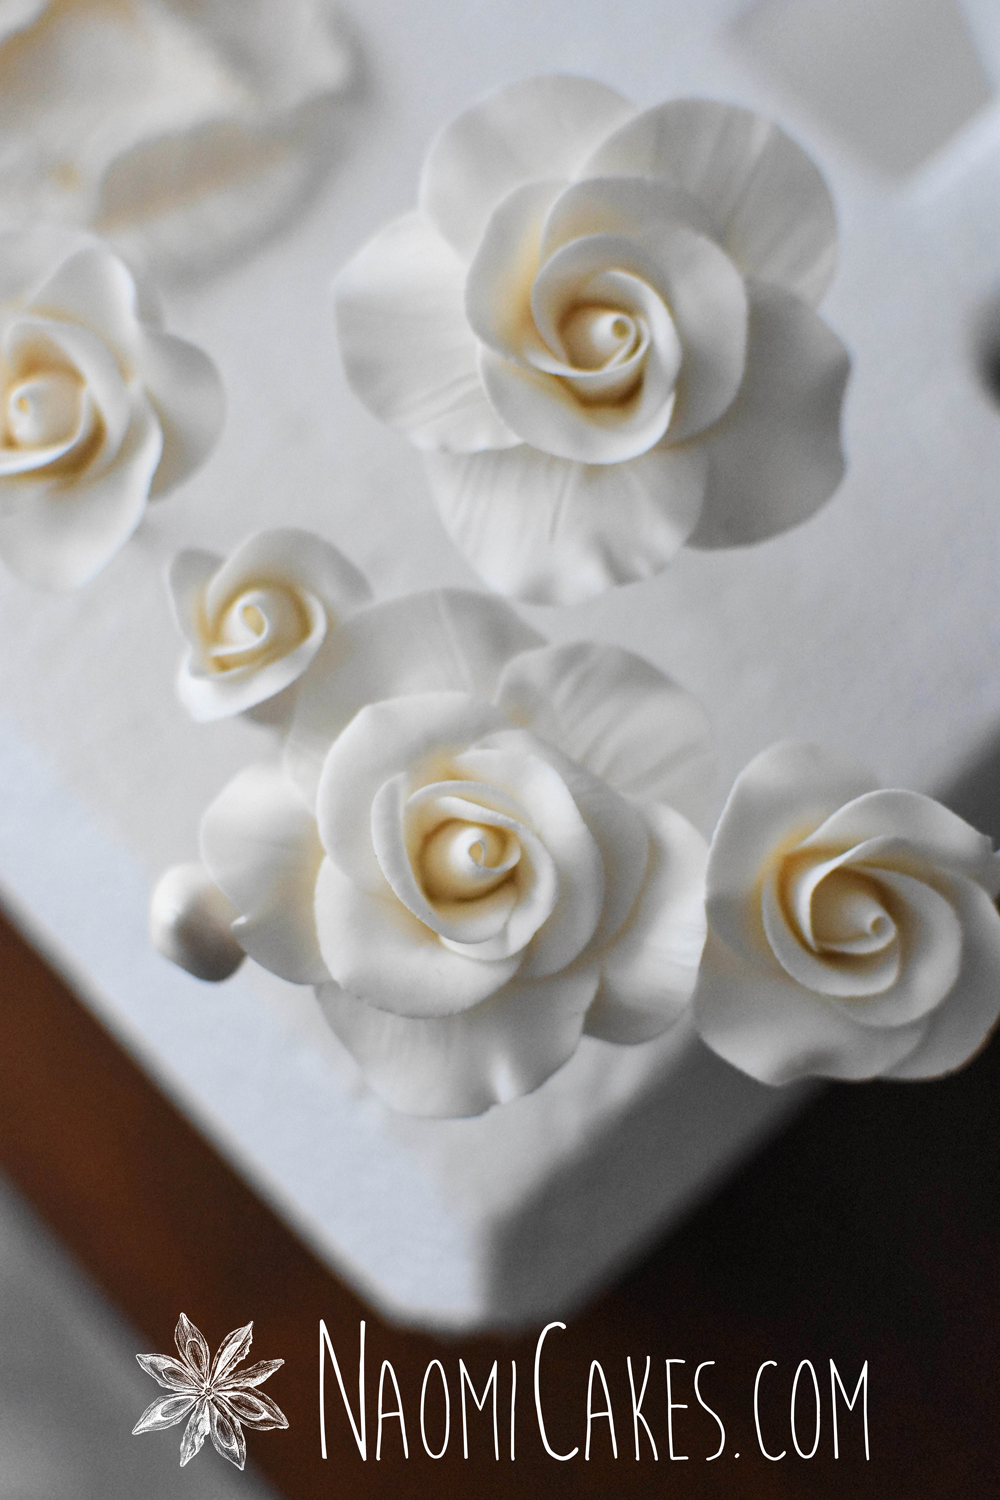
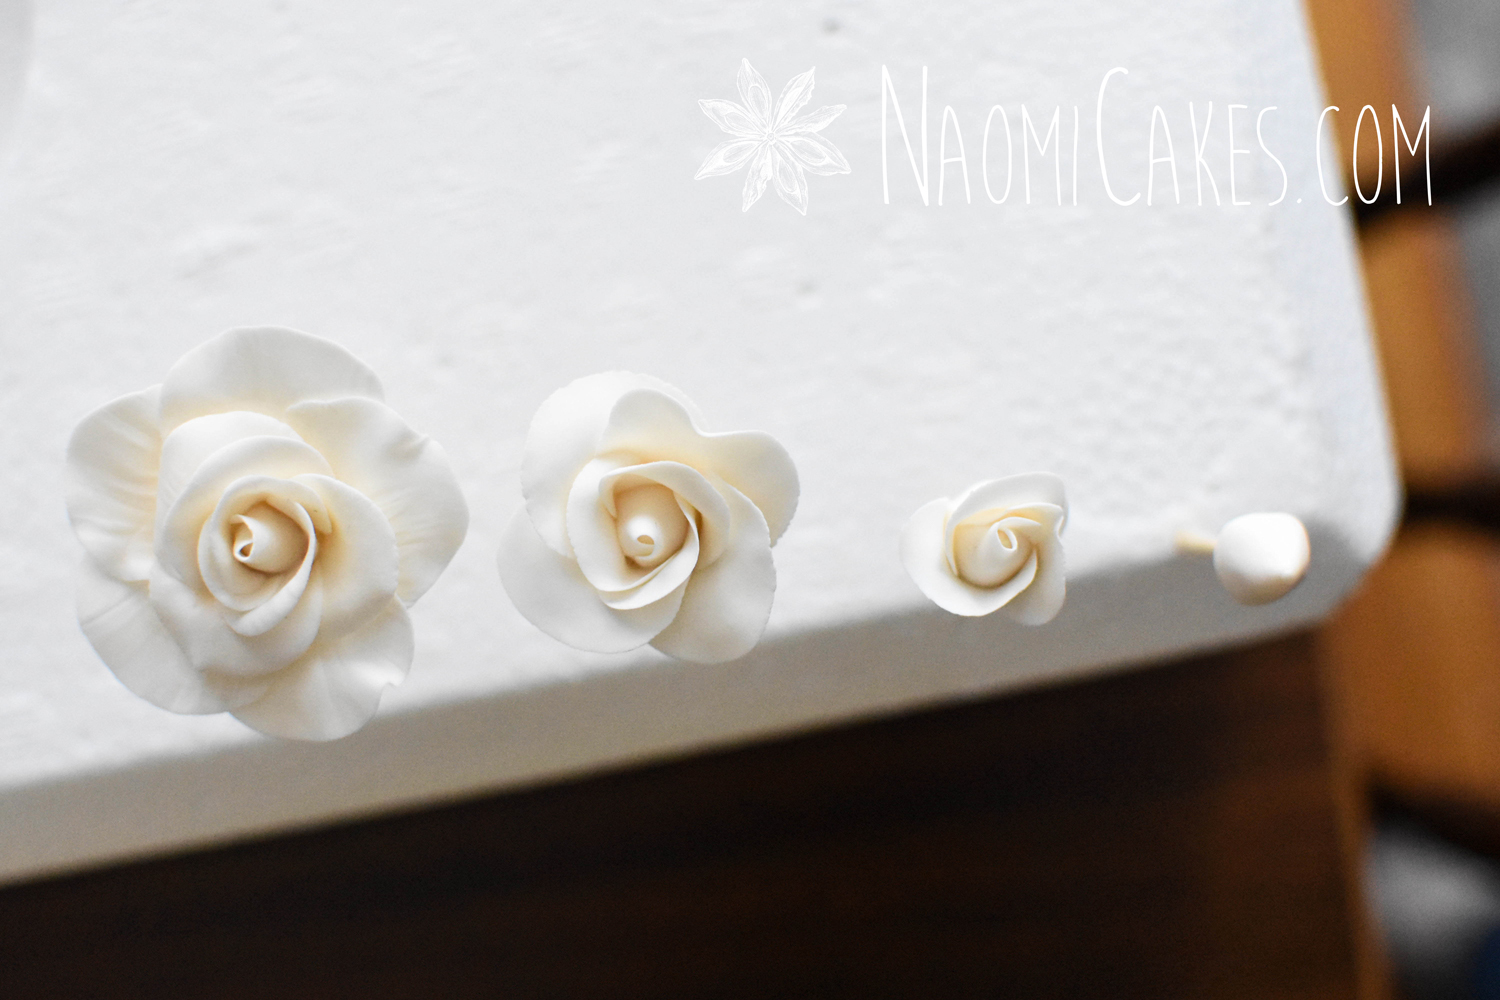
Tip: This tutorial is for making smaller roses, as pictured in the cake in the photo above. If you want to make larger roses, you can just use a set of 3 large rose cutters and follow the same instructions.
1 – Knead the gum paste until pliable
Lightly grease a clean work surface with some vegetable shortening, put a little on your hands, and knead the gum paste until smooth and pliable.
2 – Roll the gum paste until thin
Roll the gum paste out until it is quite thin; about 1/8″ or a little thinner.
3 – Cut out the teardrop shape rose petals
Using the large sized rose petal cutter from your set, cut out 5-8 petal shapes per rose base (example, for 4 roses you would need 20-32 petals; I used 5 per rose for this tutorial). Remove the excess gum paste from around the cut-outs, shape into a ball, and wrap in plastic. Set aside. Cover the cut rose petal shapes on the table with plastic until ready to use.
4 – Thin/Frill the petal edges
Lightly dust your foam mat with cornstarch to prevent the petals from sticking (I like putting it into a little homemade cheesecloth bag-like a cloth sieve- to make this most simple). Remove 1-5 petals from under the plastic at a time, and gently thin/frill the edges of each petal with the frill or ball tool (also dusted with cornstarch).
5 – Vein the petals (optional)
From the centre outward, roll the veining tool (or press the petals in a silicone veining tool) across the petals to make the impression of vertical veins on each one.
6 – Slightly set (dry) the petals
Allow the petals to rest for 20 minutes*, just to take on a little bit of structure, before proceeding to the next step. For best results, let the petals rest for 20 minutes, vein side up, on cornstarch dusted spoons. Make sure the thin, wide edge of each petal slightly sticks up off the edge of the spoon, so that the petal takes on that “curled” look.
*DO NOT LET THE PETALS REST LONGER THAN THIS
7 – Attaching petals to your prepared medium rose
Dampen the base of one petal with water on the veined side, and wrap it (vein side up) around your pre-made medium rose, with the edge of the previous petal in the middle of the new one.
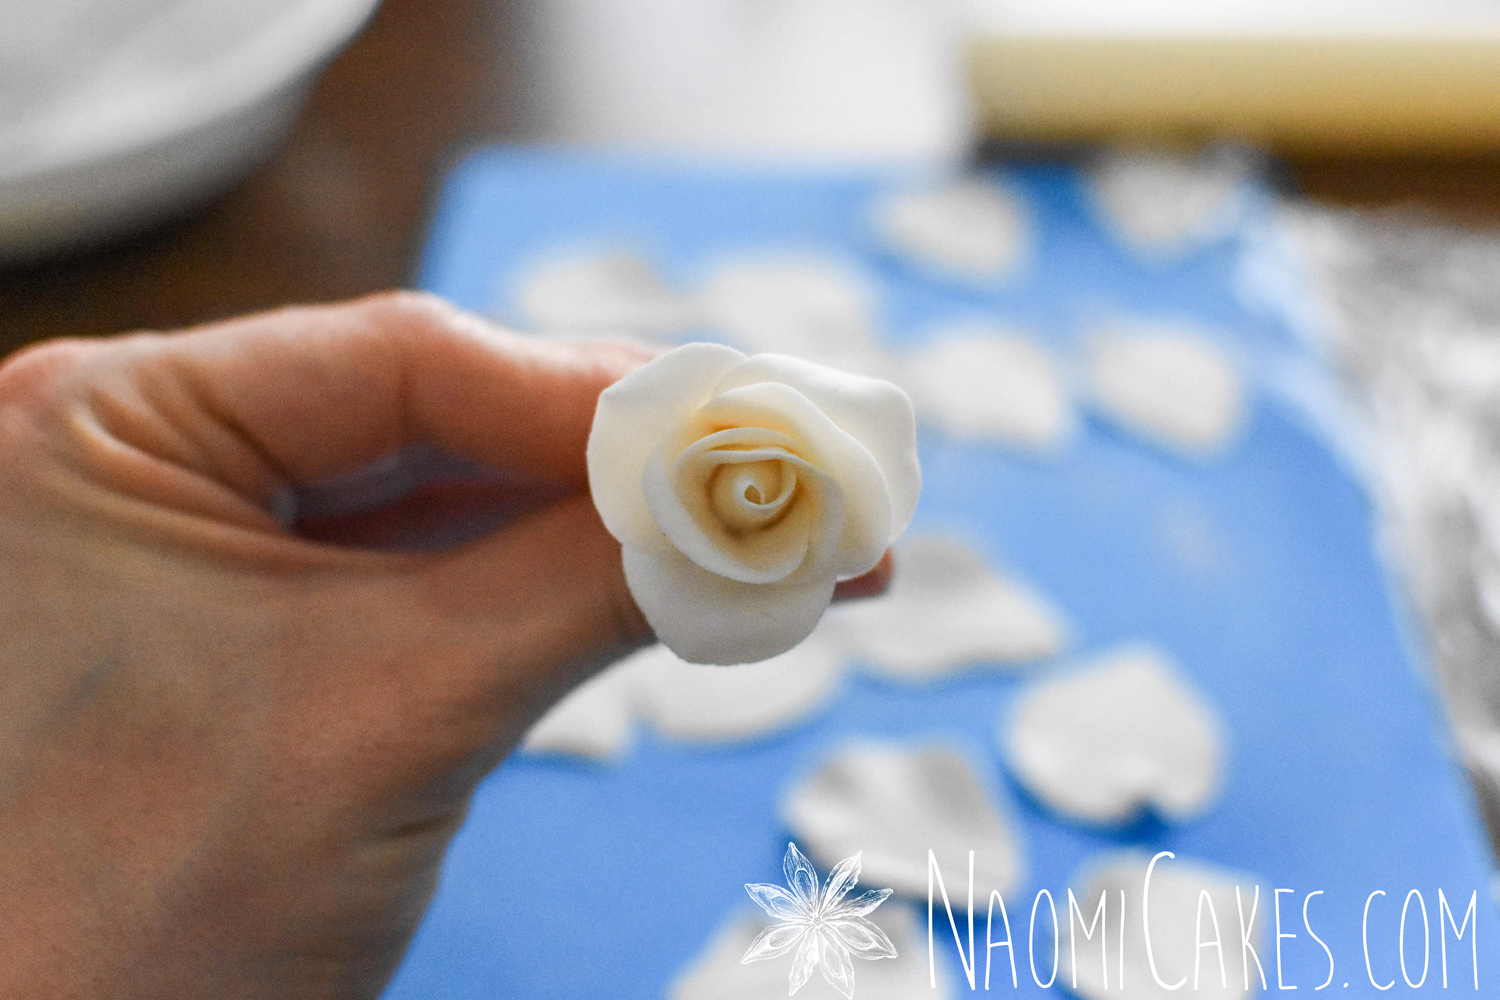
8 – Complete the rose with the remaining petals
Moisten the tip of another petal on the veined side again, and tuck the edge of it underneath the first petal (again, vein side in), securing it to the rose at the moistened base. Repeat with the remaining petals, arranging them with your fingertips to look nice and full. Frill the edges out with a cell stick or your fingertips. (See photos in this tutorial for reference.)
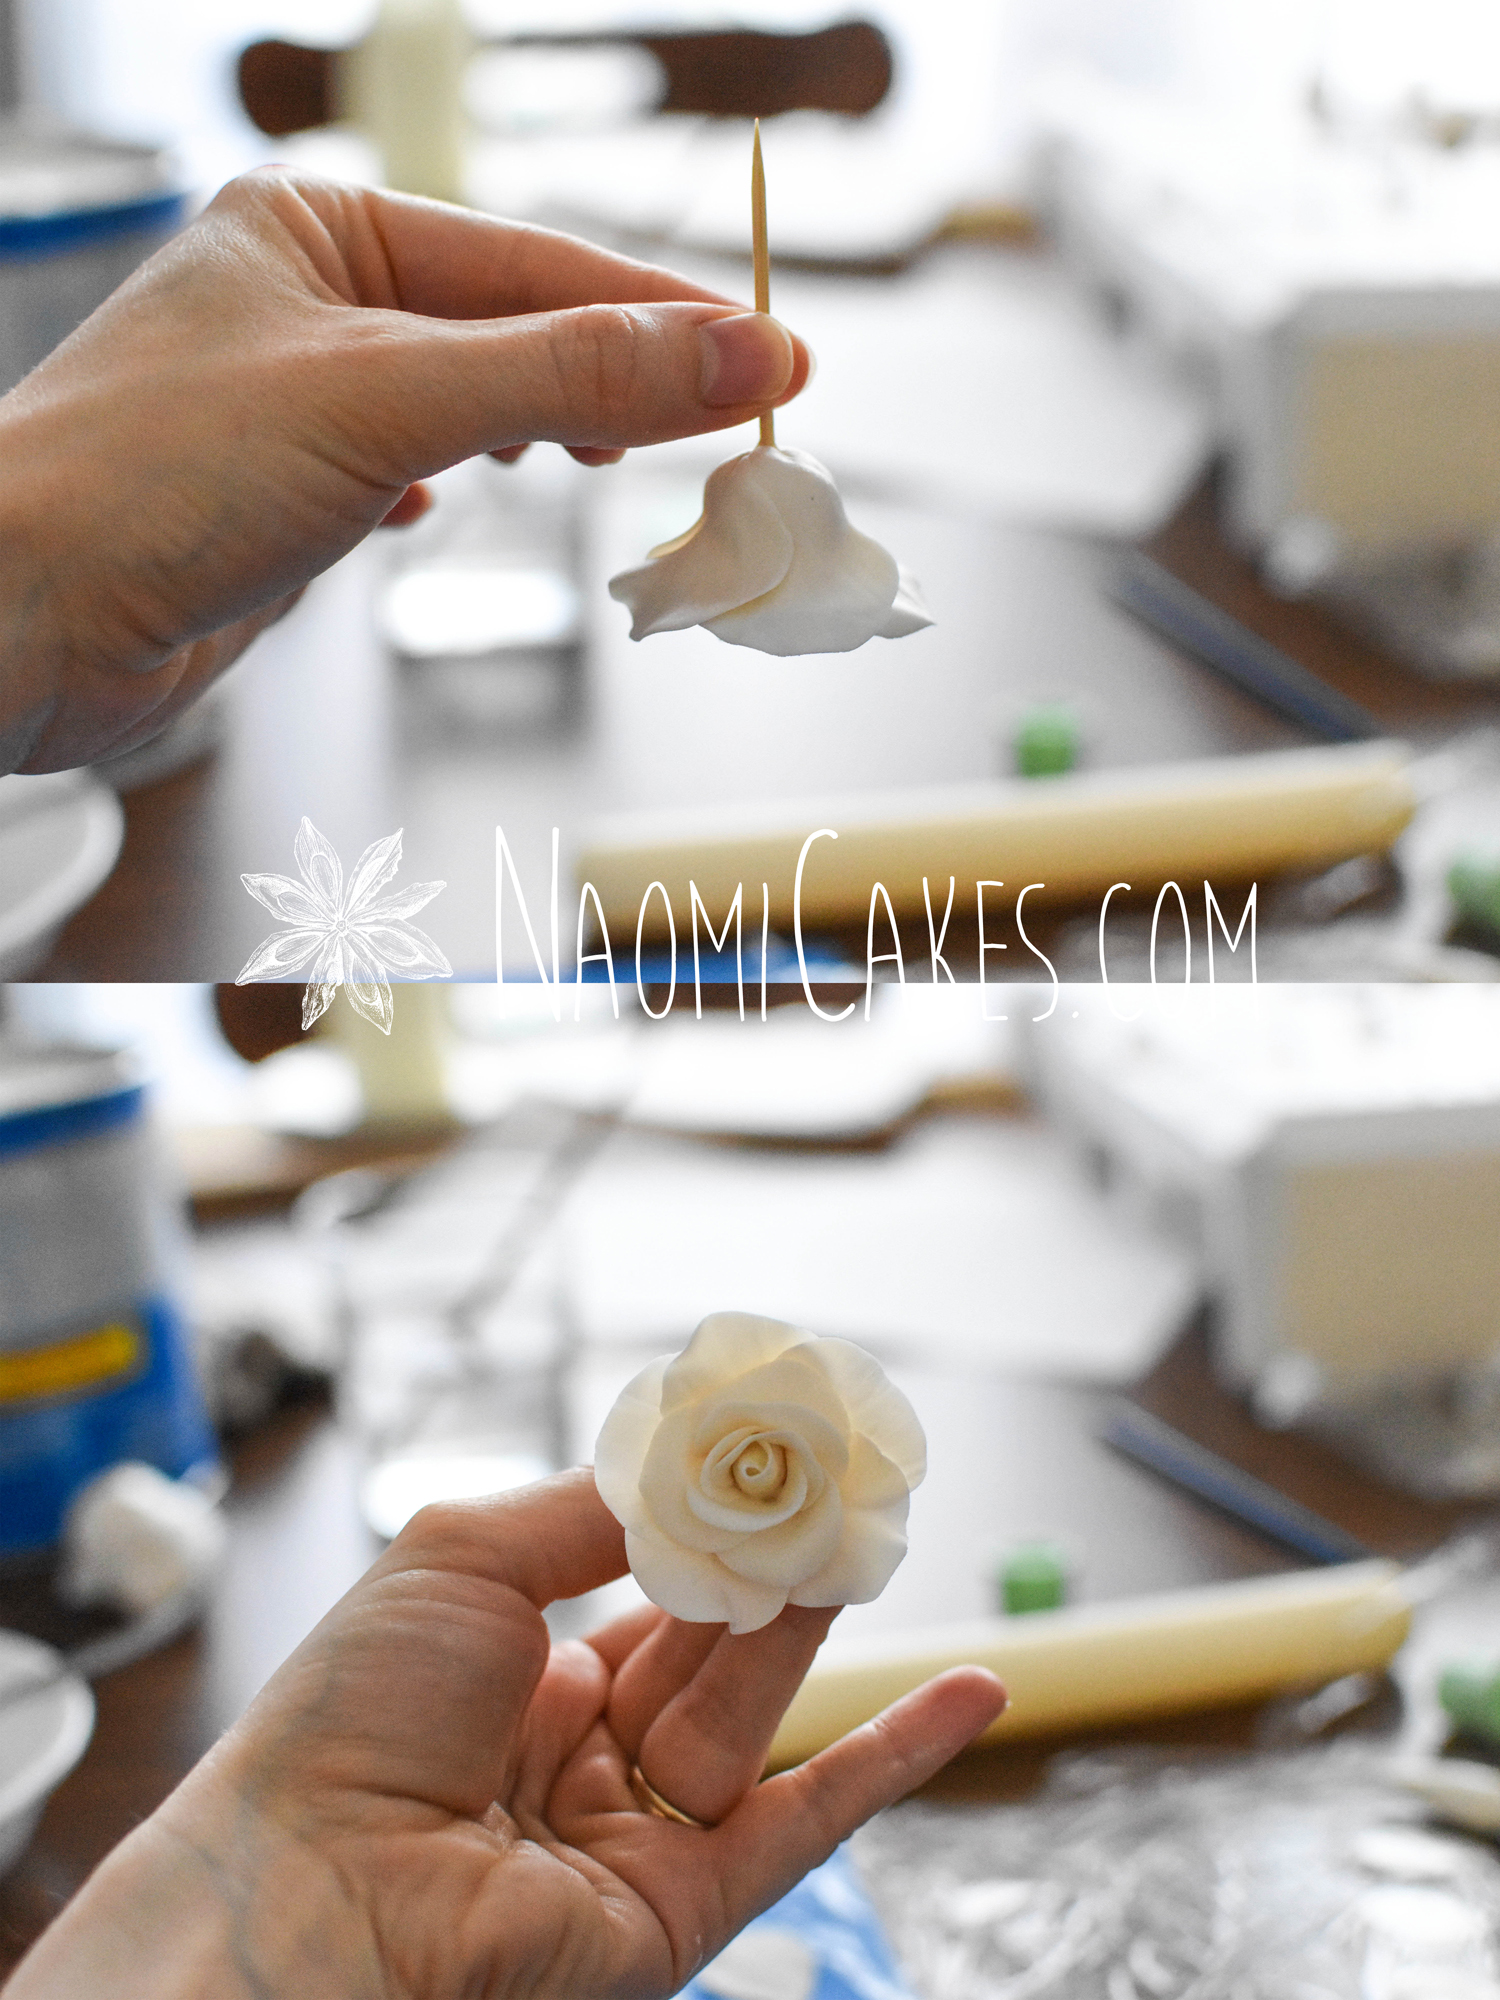
9 – Dry the roses upside down
At this point, the roses will want to “open up.” So, to keep their shape, stick the toothpick end into styrofoam upside down (see photos for reference on one way to do this) to begin to set. Allow the rose to dry completely for about 20-30 minutes, and then turn it over to sit upright and complete drying for at least 12-24 hours.
Tip: One simple way to dry roses upside down is a use 2 cups to hold up a piece of styrofoam, and allow the roses to hang upside down between the cups.
10 – Storing your dried roses
The thoroughly dry roses will keep in a cool, dry place for several months in a closed container. Humidity will cause the roses to “wilt” and you may not be able to keep them if that happens.
If you like this tutorial, you may also like:
- Gum Paste Roses – The Base, Part 1/5 [Tutorial]
- Gum Paste Roses – The Rose Bud, Part 2/5 [Tutorial]
- Gum Paste Roses – The Medium Rose, Part 3/5 [Tutorial]
- Rustic Wedding Cookies [Tutorial]
- Basic Piping Techniques for Cake Decorating [Tutorial]
- How to Frost a Cake with Buttercream (Smooth Finish) [Tutorial]
Thanks for following along! I hope tutorial serves you well. See you next week for “Painting the roses red!” (Or whatever color you like best.)
Bye for now,
Naomi
This post contains affiliate links.